Provider and local model setup
Choose an access method
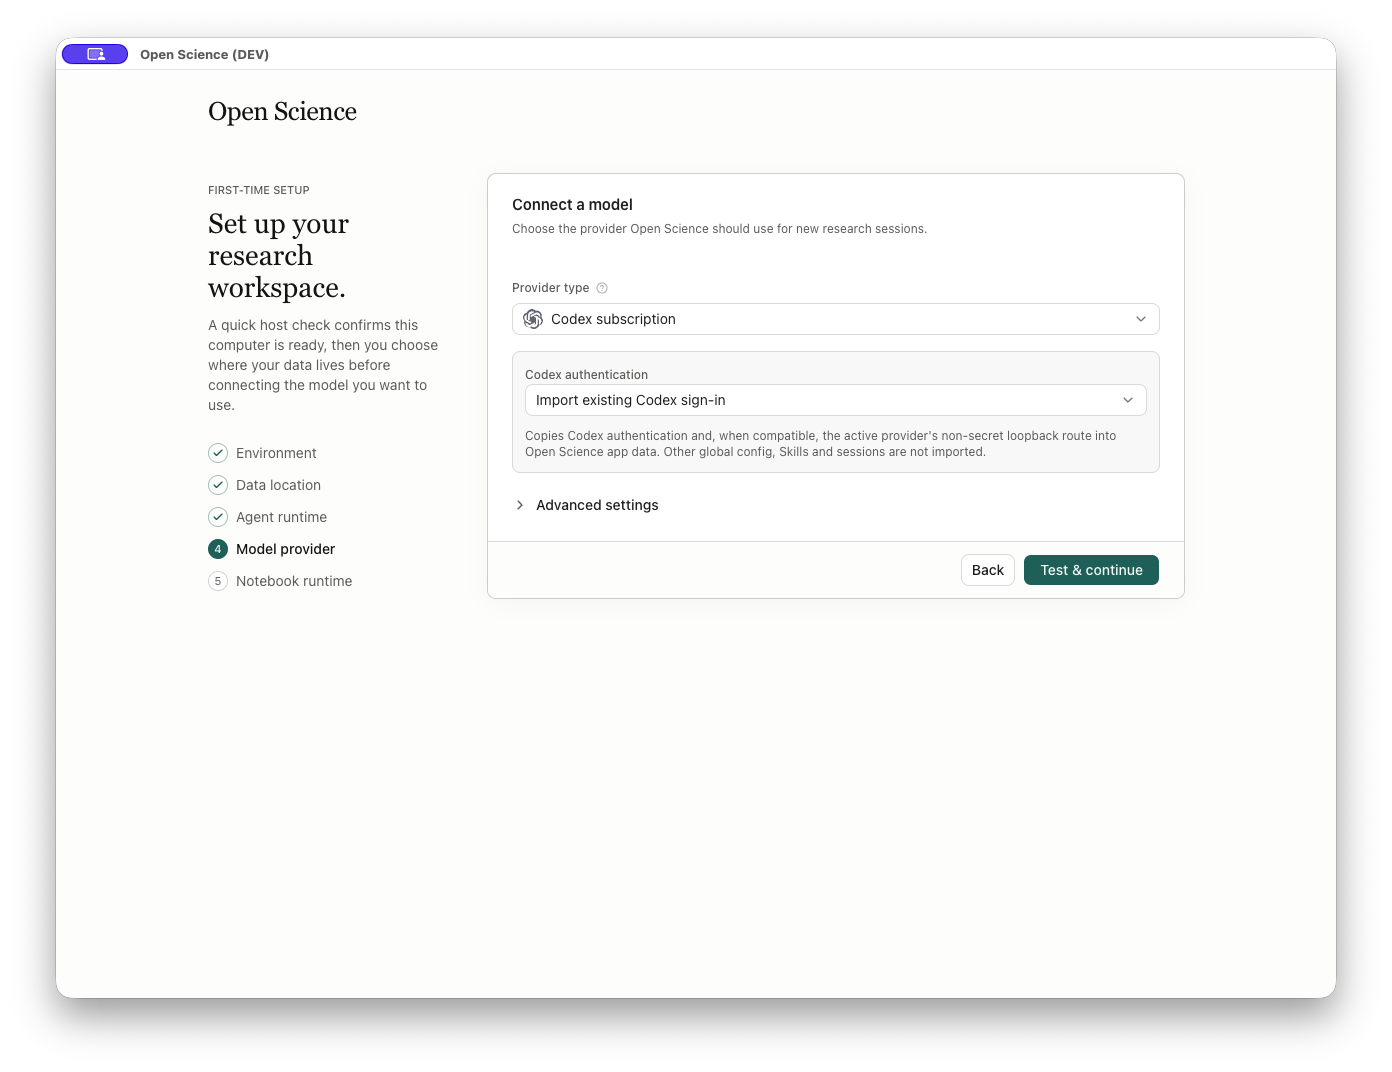
Provider type selects subscription access, an official API, or Custom Gateway. Available subscription choices depend on the active agent framework. The captured Codex setup shows Codex subscription, xAI OAuth, official APIs, and Custom Gateway; do not assume another framework presents the same choices.
| Choice | What you need | Check before continuing |
|---|---|---|
| Codex subscription | A compatible Codex sign-in | Inspect the Codex authentication choice; importing existing access copies authentication into Open-Science |
| Official API | Access to that provider and the requested model | Confirm provider, region when applicable, and API credential |
| Custom Gateway | A compatible endpoint, exact model ID, and an API key when required | Confirm the API format and supported model features with the gateway operator |
Choose Import existing Codex sign-in to copy a working local sign-in into Open-Science. The import can include a compatible non-secret loopback route; other global configuration, Skills and sessions stay separate. Under Advanced settings → Transport, keep Auto (recommended) unless your connection requires a different transport.
Choose a provider region or a free catalog model
For SenseNova, select China or Global in the provider form before choosing a model. Use the API key for that region, review the resulting model list, save, and test the connection. Switching regions can change both the endpoint and available models; a key or model name from the other region may not work.
For gateways such as OpenRouter or OpenCode Zen, select a free model only when that exact entry is offered for the active framework. Use the account and credential required by the service. A free catalog entry does not remove usage limits or establish support for every tool or image input. Do not append :free to an arbitrary model ID. Send a small request and check the returned model and result before using the connection for research.
Connect an existing Codex subscription
- Open Settings → Model → Add provider.
- Set Provider type to Codex subscription.
- In Codex authentication, choose Import existing Codex sign-in. This requires a usable sign-in on this computer. It copies authentication into the application profile; it does not import your other Codex sessions or Skills.
- Select Save. Wait while the provider row shows Testing…; a saved row alone is not the success check.
- Confirm Connection verified and Authentication imported into Open-Science in the provider row. The released interface may display the product name without a hyphen.
- In Main model, select an available subscription model. For example, select an available gpt-5.6-sol entry if your account offers it. Check the model name and provider together, especially when multiple providers offer similarly named models.
- Open a project and send a bounded request. A connection test verifies authentication, while an actual response verifies the request path. Confirm the response and any tool-permission request appear in that session.
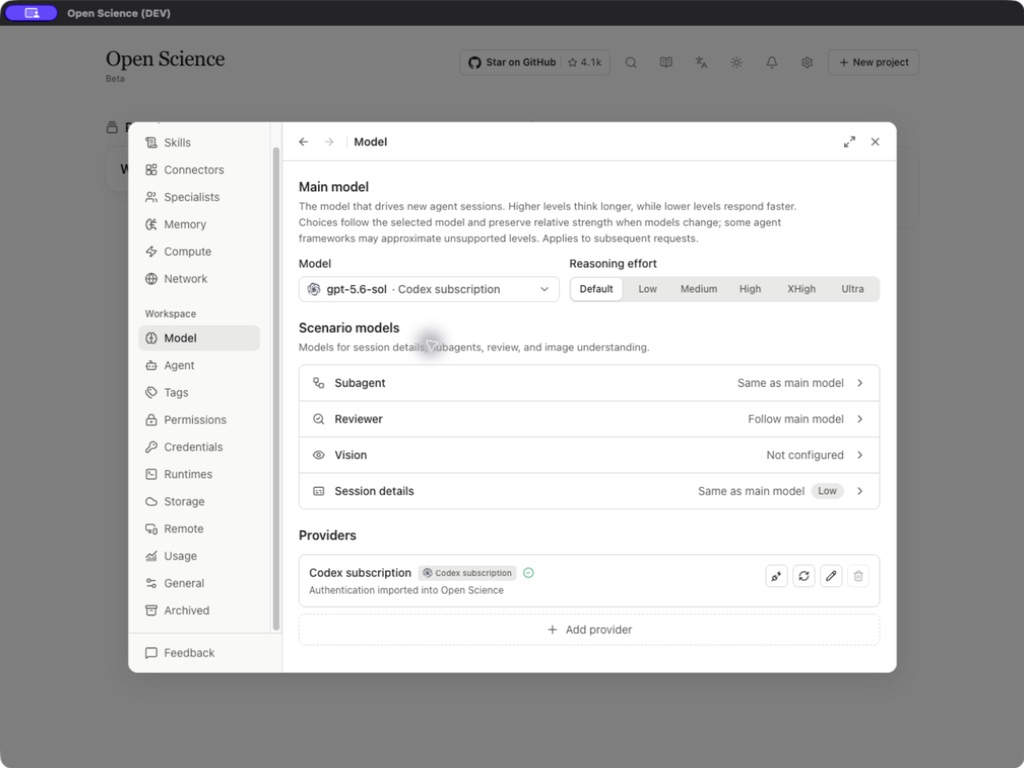
| Provider-row control | Use it when | Success check |
|---|---|---|
| Check Codex login | The saved connection may have expired. | The pending check settles into the displayed verified or failed state. |
| Re-import Codex login | You have refreshed the external sign-in and want to update the application copy. | Authentication is imported and checked again. |
| Edit | You need to review authentication or transport settings. | Save the intended settings and recheck the connection. |
| Delete | An unused provider should be removed. | Availability depends on whether the provider is still required; an active dependency can prevent deletion. |
If import reports that a file-backed Codex login is missing, sign in through the supported Codex flow and retry Re-import Codex login. A login held only in an external credential store is not necessarily an importable file.
Do not interpret Testing… as failure, or Connection verified as proof that every listed model and tool can run. If import fails, complete the supported Codex sign-in flow and retry; do not paste authentication JSON into a prompt or documentation.
The agent runtime runs the work; the model provider supplies the model. Installing Codex does not automatically connect a provider. In first-time setup, this page follows Agent runtime. After setup, open Settings → Model to manage provider access.
Update or remove an API credential
After changing a key at the service, find its provider in Settings → Model, select Edit, enter the replacement in API key, and save. Leaving this field blank keeps the existing key; it does not clear it. Wait for the connection test. If authentication fails, check the endpoint, the account the key belongs to, and its validity before retrying.
After Connection verified, complete a small request with that provider. Remove an unused provider with Delete, checking its name in the confirmation. Removing the application configuration does not revoke the key at the service.
Custom Gateway: every visible field
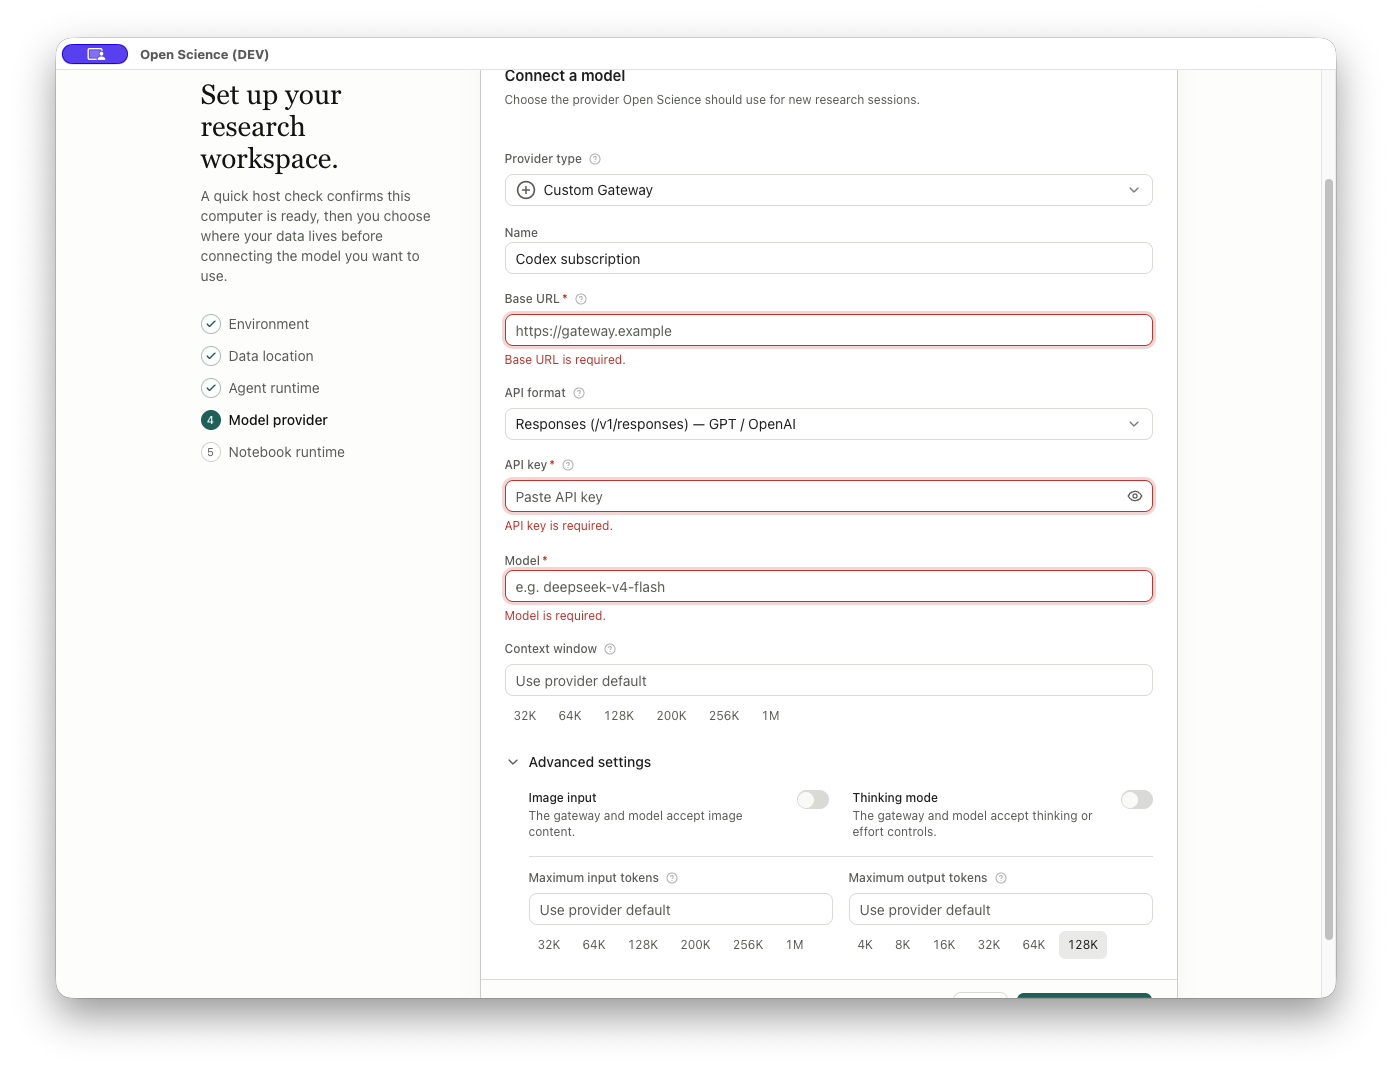
Start by selecting Custom Gateway. Changing the provider type can preserve the display name from the previous selection, so review the name instead of assuming it was reset.
| Field or control | Input and behavior |
|---|---|
Provider type | Selects the provider family and changes the visible form |
Name / Provider name | Optional display name, such as Lab gateway; not a model identifier |
Base URL | Required gateway base address. Remote model endpoints require HTTPS; HTTP is allowed for localhost and loopback addresses. Use your operator’s actual address, not the nonworking https://gateway.example placeholder. |
API format | Select Chat Completions, Messages, or Responses; the displayed route helps identify the corresponding protocol |
API key | Required for remote gateways; optional for a local loopback gateway that needs no authentication. Enter a real credential if your local server requires one |
Eye / Show API key | Toggles visibility of the current key input; keep it hidden before capturing or sharing the screen |
Model | Required exact model identifier accepted by the endpoint; the screenshot's demo-model is only a placeholder |
Context window | Optional model context limit; blank requests the provider default |
| Context presets | 32K, 64K, 128K, 200K, 256K, 1M; selecting 128K fills 128000 |
Advanced settings | Expands or collapses capability and token-limit fields |
More information (i) | Opens contextual help beside the associated label |
Back | Returns to Agent runtime; the wizard owns the form draft so it can survive navigating back |
Test & continue | Validates required fields, then saves/tests the provider when valid; advances after a successful applicable validation |
The three API formats shown in the menu are:
- Chat Completions —
/v1/chat/completions. - Messages —
/v1/messages. - Responses —
/v1/responses.
These are protocol choices, not instructions to append every listed route to the Base URL. A gateway can support one format without supporting the others.
Advanced fields and conditional controls
An older remote HTTP configuration remains editable but cannot send requests. Obtain an HTTPS endpoint from the service operator, save it and test again. A local loopback model server can keep its HTTP address; a remote LAN server still needs HTTPS.
Advanced fields and conditional controls
| Field or control | How to set it |
|---|---|
Image input | Enable only if both gateway and selected model accept image content |
Thinking mode | Enable only if the gateway/model accept thinking or effort controls |
Supported effort levels | Appears with thinking enabled; select the levels actually supported, rather than inferring them from a model name |
Reasoning request format | Appears for Chat Completions with thinking enabled; select how the gateway expects effort parameters |
Maximum input tokens | Optional separate input limit; blank uses the provider default. Presets: 32K, 64K, 128K, 200K, 256K, 1M |
Maximum output tokens | Optional separate output limit. Presets: 4K, 8K, 16K, 32K, 64K, 128K |
Enable Thinking mode to configure supported effort levels. For Chat Completions, also select the reasoning request format supported by your endpoint. These declarations must match the provider's API capabilities.
Test the gateway configuration
- Select Custom Gateway and expand Advanced settings.
- Enter the Base URL and exact model ID supplied by the gateway operator, plus an API key when required. Missing required fields produce inline errors and keep you on this page.
- Enter a recognizable display name. For a real connection, enter the actual endpoint and model supplied by your provider; demonstration placeholders cannot pass a connection test.
- Choose a context preset and confirm the numeric value.
- Enable Thinking mode only when supported, then inspect the newly visible effort fields. Changing API format may change the available fields.
- If a key is required, enter it privately and keep it hidden. Select
Test & continuewhen you are ready for a provider request. - Wait for the result.
Testing connection…indicates pending validation; repeated clicks are disabled. Subscription flows instead useSign in & continue,Waiting for sign-in…, andCancel sign-inwhere applicable.
Connect a local model endpoint
Example Connect a local Qwen model through Ollama
A local model server runs separately from Open-Science. Choose Custom Gateway for a compatible endpoint, and use an Agent that supports its API format. The example below uses Ollama with OpenCode. Installing a Python Notebook interpreter does not install a model server.
Start the server and download the model
Install Ollama, then start a local-only test server in a terminal:
OLLAMA_HOST=127.0.0.1:11435 OLLAMA_CONTEXT_LENGTH=32768 ollama serve
Keep that terminal open. In another terminal, download the model to that server:
OLLAMA_HOST=127.0.0.1:11435 ollama pull qwen3:0.6b
Wait for the download to finish. If the server is running but the requested model is absent, Open-Science can report Test failed: the configured model was not found. Finish the download, confirm the exact model ID, and select Test connection again.
Enter the provider settings
Open Settings → Model → Add provider and enter:
| Field | This local connection example |
|---|---|
| Provider type | Custom Gateway |
| Name | Local Qwen demo |
| Base URL | http://127.0.0.1:11435 |
| API format | Chat Completions (/v1/chat/completions) |
| API key | Leave blank for this unauthenticated loopback endpoint; use the actual credential for an authenticated gateway |
| Model | qwen3:0.6b |
| Context window | 32768, matching the running server |
| Advanced settings → Maximum output tokens | 4096 |
| Image input / Thinking mode | Off for this connection check |
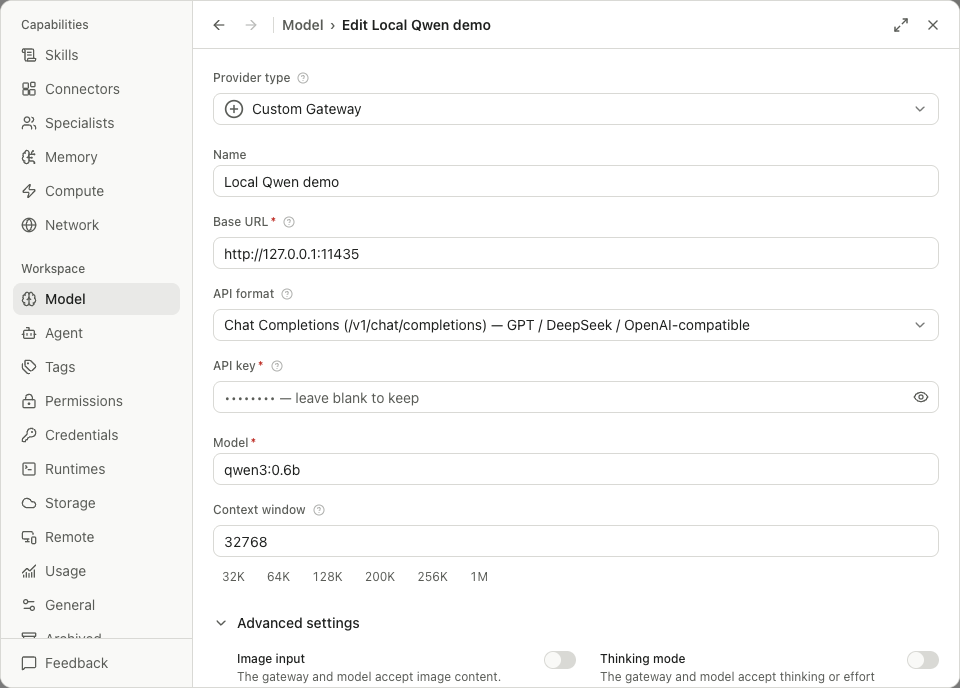
The form appends /v1 to the gateway root. Open-Science accepts a blank API key for loopback addresses such as localhost, 127.0.0.1 and [::1]; the older screenshot may show a placeholder. A remote or LAN gateway still requires HTTPS and an API key. Use the API format your local server supports.
Set an output budget that leaves room for input and conversation history. OpenCode reserves an output budget when this field is blank; a large reserve can cause repeated compaction in a small context window. The declared context window also needs to match the model server’s allocation. Changing the form alone does not change Ollama’s runtime configuration.
Select a compatible Agent and check a reply
In Settings → Agent, install OpenCode → App-managed download if it is missing, then select its card and confirm Switch. Return to Model and select the local model. Start a new conversation with a short connection-only request before using it for research. Check that the request actually finishes; a saved provider or a successful connection test alone does not establish reliable scientific reasoning, tool use or image support.
The connection check completed with Local model connected. using the configured local endpoint and OpenCode. It verifies a text request, not a biomedical analysis.
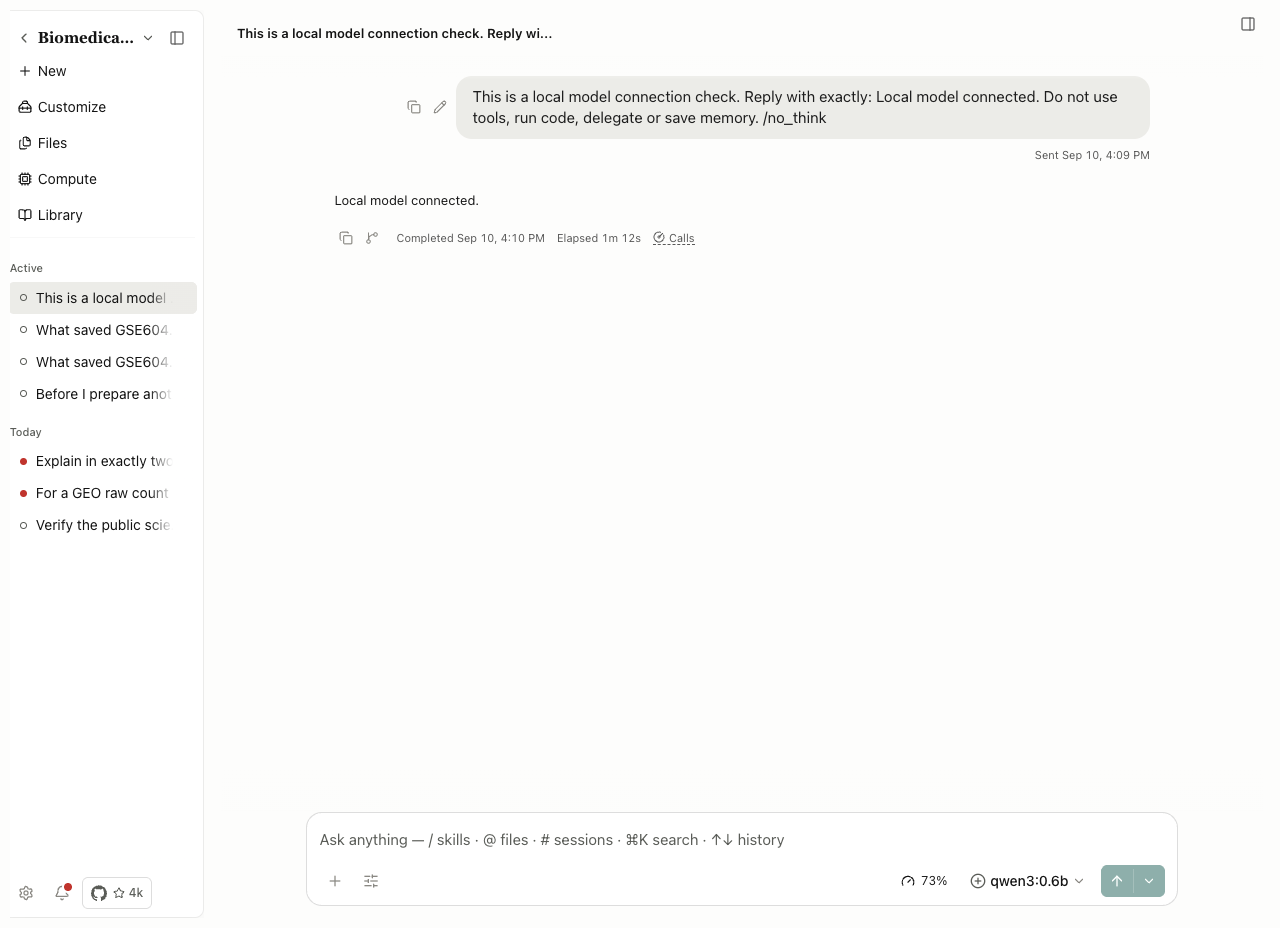
Keep the server running while using the model. For an Agent on another host, localhost refers to that host. A browser reaching an endpoint does not prove the Agent can reach it.
Check an actual tool call
Example Check a local model’s Notebook tool call
After confirming a connection, use a small task with a known result to test the tool path. Ask the agent to execute this through the Python Notebook instead of returning mental arithmetic:
print(8664 + 18515)
print((8664 + 18515) == 27179)
These are the first GSE60450 sample's zero-count and detected-gene counts. Inspect the proposed code in the permission panel, approve it, then open Notebook and verify 27179 / True.
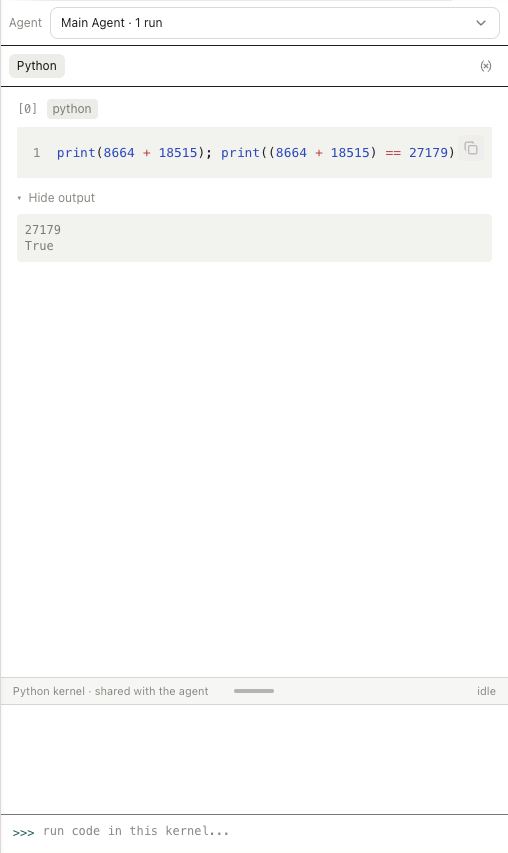
Local qwen2.5:7b completed this call through the Codex framework and a local Chat Completions endpoint. Its initial proposal referenced an unavailable helper module; the check succeeded after declining that proposal and specifying the dependency-free code above. This verifies a bounded tool operation, not reliable planning of a complete RNA-seq analysis or equivalent behavior under another Agent framework.
If setup does not advance
| Symptom | Next check |
|---|---|
| Required-field messages | Complete the named fields; a display name alone is insufficient |
| Secure key storage unavailable | Unlock or authorize the operating-system credential vault; keys cannot be saved until it is available |
| Connection/authentication failure | Check the credential, endpoint, format, and access to the specific model |
| Provider changed during testing | Review the current provider and test again; a superseded result must not complete setup |
| Sign-in canceled | Start again when ready; cancellation is not a successful connection |
| Installed runtime but no usable provider | Finish model connection; runtime installation and provider authorization are separate |
HTTP error lookup
For 400, 401, 403, 404, 429 or 5xx responses, use the HTTP troubleshooting table. Keep the responding service and its detailed message with the status code.
Source: ProviderForm.tsx, ProviderStep.tsx.