SSH hosts and Slurm setup
Configure an SSH host and choose Direct SSH or Slurm before submitting a remote job. A saved host profile does not establish successful authentication or execution.
Use Settings → Compute to register a server or cluster. Registering the host, making it available to a conversation and completing a job are separate milestones. Keep the site's login-node rules and scheduler requirements with the host notes.
Choose where jobs execute
| Execution mode | Job execution | Command calls | Appropriate environment |
|---|---|---|---|
| Direct SSH | Directly on the SSH login host | On the SSH login host | A machine where direct workloads are permitted |
| Slurm | Submitted and managed through Slurm | Still on the SSH login host | A cluster requiring scheduled allocations |
Selecting Slurm does not move every command onto a compute node. Do not interpret login-host CPU, RAM or GPU information as the resources allocated to a future Slurm job. Inspect the job's actual allocation before interpreting its results.
Add the connection
Select Add SSH host. Pick an existing alias or type the host identifier. The form defaults to SSH configuration authentication and Direct SSH execution.
| Field or control | Input and effect |
|---|---|
| From ~/.ssh/config | Select a discovered alias; disabled when no aliases are available |
| Or type a host alias | Required host/alias, 1–255 characters after trimming; no NUL or line breaks |
| Optional host notes | Scheduler rules, partition/account, modules, package-install policy and environment locations; maximum 32,768 characters |
| Execution mode | Direct SSH or Slurm; saved per host |
| SSH configuration | Resolve connection settings with ssh -G; use existing SSH configuration, keys or ssh-agent |
| Advanced settings → User | Optional override; blank preserves SSH resolution |
| Port | Optional for SSH configuration; if supplied, integer 1–65535 |
| Identity file | Optional key-file override; blank uses configuration/agent behavior |
| Username and password | Requires User, Port and Password; does not use keys or ssh-agent |
| Cancel | Leave without registering the form |
| Add | Submit a valid connection; password authentication must pass its connection test before the host is added |
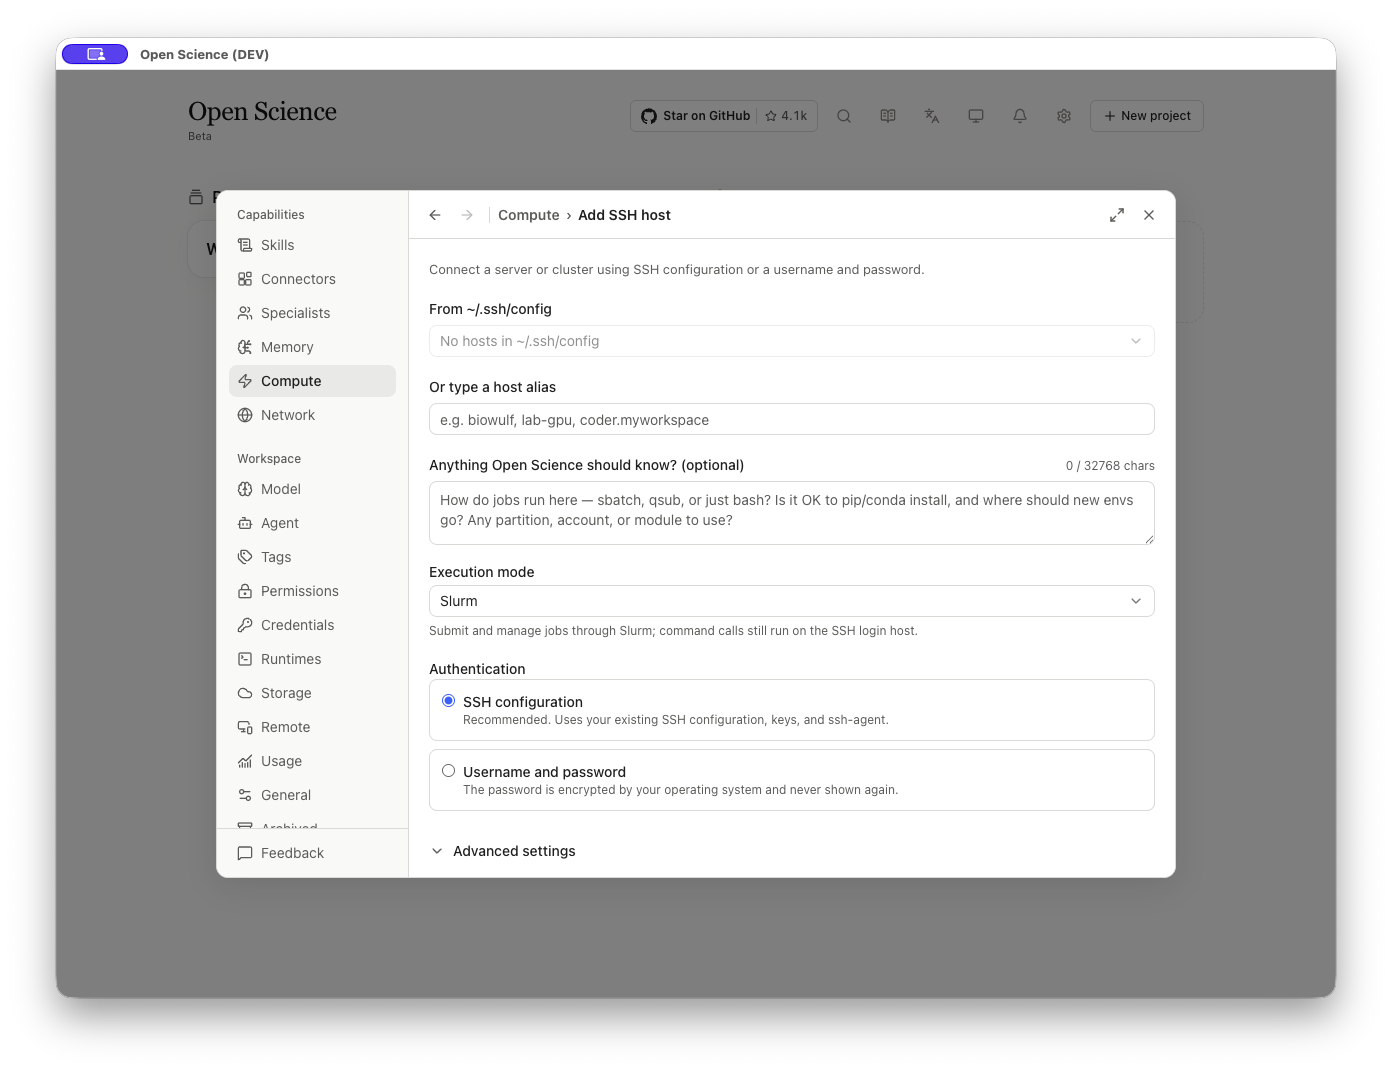
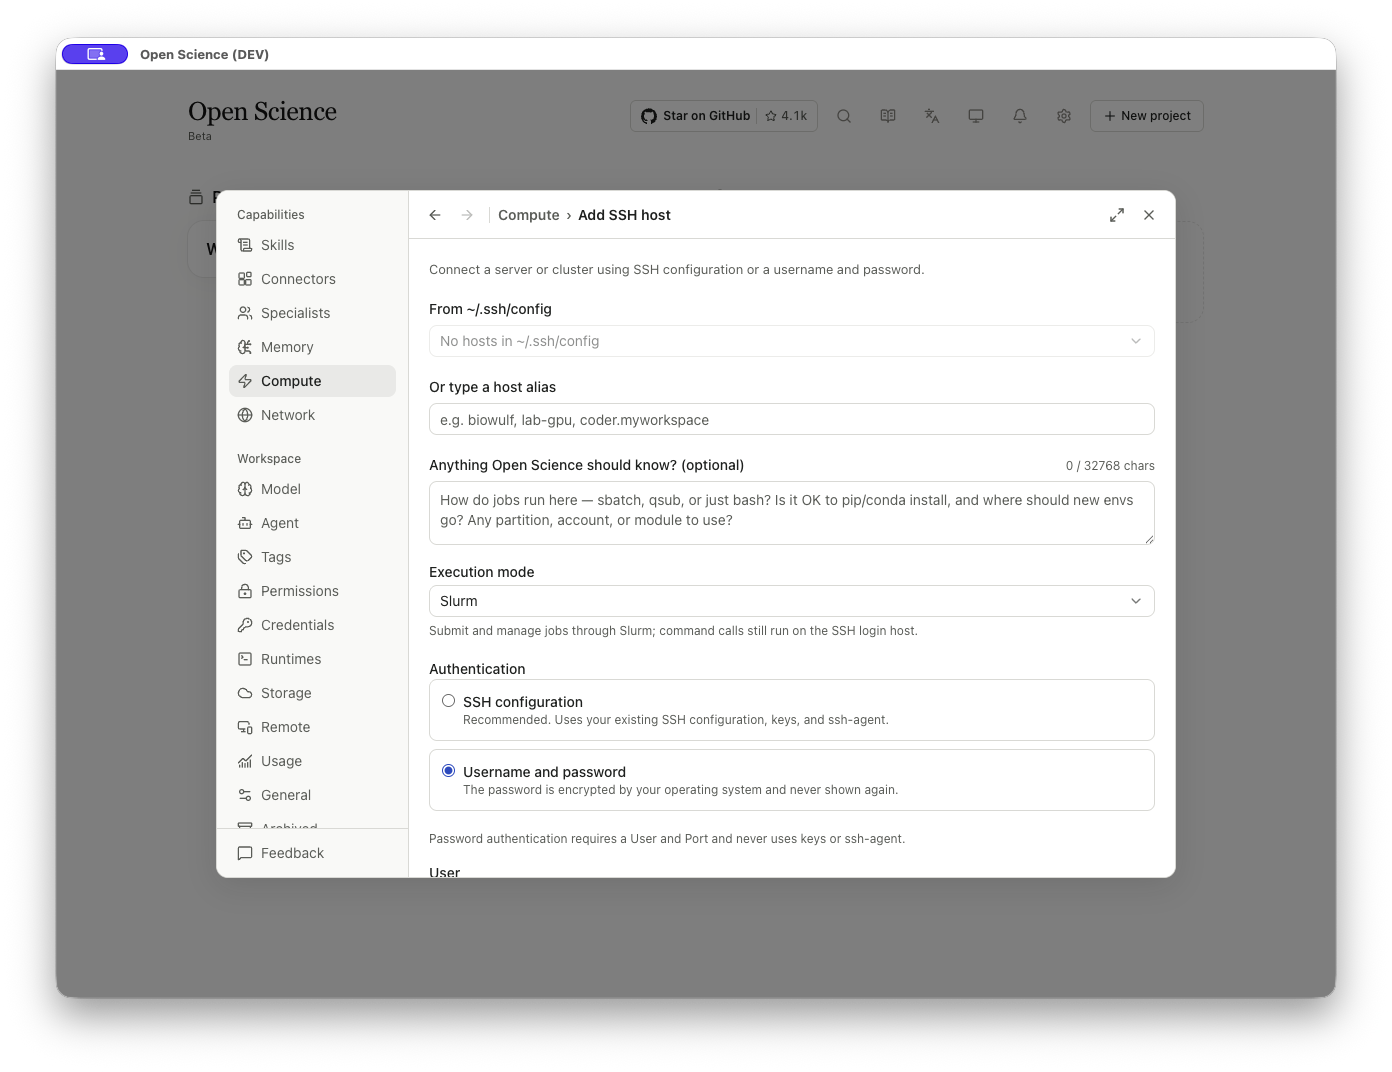
Password mode depends on the application's password-authentication and secure-storage capability. If it is unavailable, inspect the reason displayed in the form. Enter credentials in that field, not in host notes or an agent request.
For an SSH-configuration host, the app creates the record, opens the detail view and starts a background probe. An added row therefore does not prove authentication or compute readiness. Read the probe result before allowing a task to use it.
Connect a password-protected research server
- Open Settings → Compute → Add SSH host. Enter your server address or alias.
- Select Username and password, enter User, Port and Password, then select Add. Use the port supplied by your administrator; the example server uses port 22.
- If the app reports The SSH host key is unknown. Verify it in a terminal before connecting., establish host trust first. Connect to the same host and port with your system SSH client, compare the displayed fingerprint with the administrator's fingerprint, and accept it only when they match. Return to the app and retry Add. Do not disable host-key checking to dismiss the message.
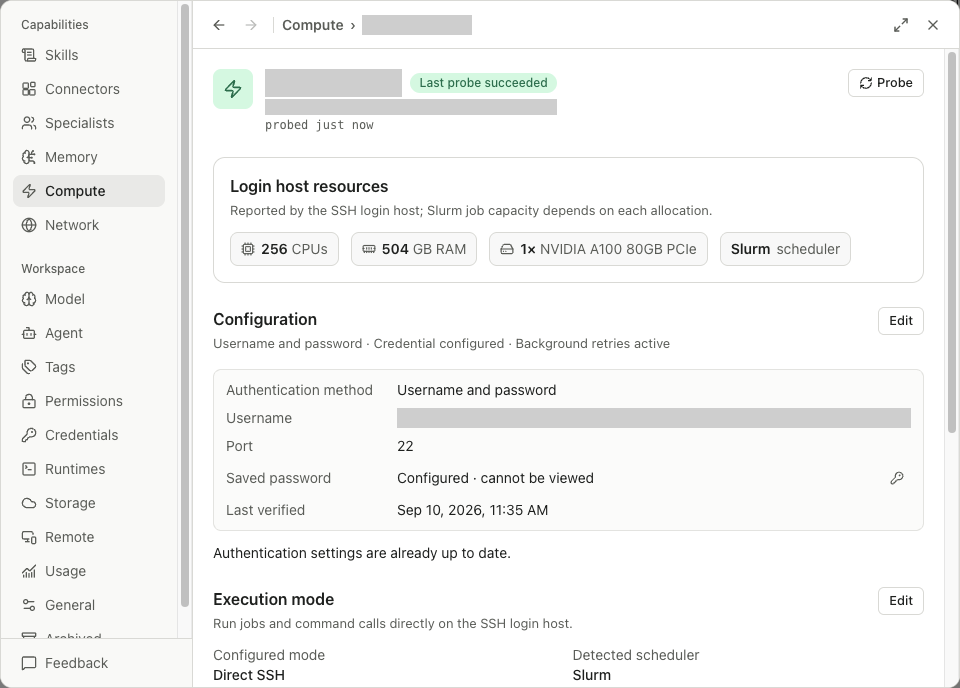
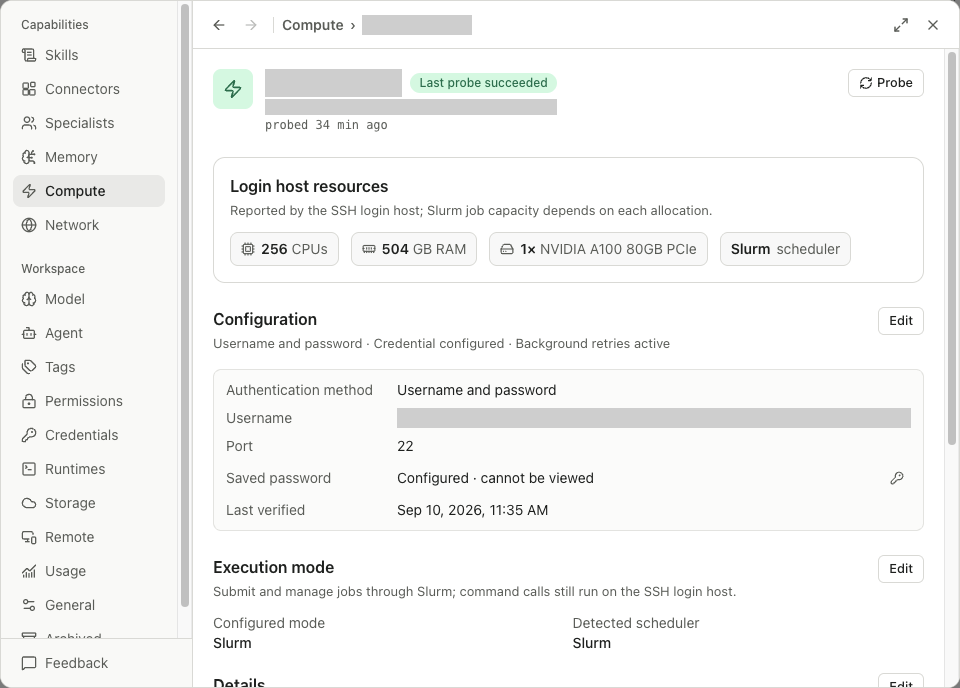
- Wait for Last probe succeeded. In Configuration, check Credential configured, the authentication method and the last verification time. The saved password is marked Configured · cannot be viewed.
- To check or change an existing connection, open Configuration → Edit and use Test and save. Read the notice before changing authentication: session enablement and permission grants are cleared when the new configuration is committed. Re-enable the host for the intended session afterward.
The English example shows a successful password-authenticated probe: 256 CPUs, 504 GB RAM, one NVIDIA A100 80GB PCIe and a detected Slurm scheduler. The configured mode remains Direct SSH until you explicitly change it. These are this server's login-host resources, not minimum requirements or a scheduled allocation. Host and account identifiers are obscured in the screenshot.
Inspect and maintain host details
| Section or button | What to check |
|---|---|
| Probe / Retry probe | Refresh connection/resource detection; distinguish Not probed, Probing, Last probe succeeded and Probe failed |
| Resources / Login host resources | Detected CPU, memory, GPU and scheduler information; scheduler allocations have separate capacity |
| Configuration → Edit | Inspect authentication settings and current credential state |
| Test and save | Test the candidate authentication configuration before saving; a changed configuration clears session enablement and Permission Grants. An unchanged configuration reports that settings are already up to date |
| Execution mode → Edit → Save | Change the configured mode; compare it with Detected scheduler |
| Details → Edit | Update host-specific instructions; Save commits, Cancel discards |
| Show more / Show less | Expand or collapse long notes |
| Scratch root → Edit | Save the remote temporary-work path as a pinned value |
| Restore auto-detection | Remove the pinned scratch override so future probing can supply it |
| Concurrent job limit → Edit | Set an integer from 1 to 500; the displayed default is 10 |
| Host removal | Review the application's removal dialog and active-job restrictions before confirming |
The scratch root is a path on the remote host. It is not your laptop's artifact directory. Confirm that the account can write there and that the site's cleanup policy gives you enough time to collect results. A concurrent-job limit does not replace the scheduler's own quotas or resource limits.
Choose a job scratch directory
Open Scratch root → Edit, enter a writable absolute path approved for your server, then Save. PINNED means a later Probe will preserve your choice. Confirm write access by inspecting the first job's work directory and output.
For a first run, open Concurrent job limit → Edit, enter 1, and select Save. This limits app-managed jobs on this host to one at a time. It does not reserve a CPU, enforce a memory limit, or prevent other users from running work. Lowering the limit does not stop an existing job. Use Restore auto-detection only when you want subsequent probes to supply the scratch path again.
Keep host instructions separate from detected resources
The saved host instructions are independent of Resources. A successful probe does not create setup instructions, and empty instructions do not mean that probing failed. Keep scheduler policy, environment activation and reproducible setup steps in Details; read CPU/RAM/GPU detection in Resources.
When an agent updates instructions, it must read the saved document first and replace that exact current content. If another edit has changed it, reread and compare before retrying. Do not use a probe summary as the document being replaced. Host instruction contract.
Make a host available to a task
In the conversation's Agent controls, inspect Compute Host availability and selection. A selected host must also be enabled. Name the intended host and execution mode in a task that could otherwise run locally. Keep the first remote request small enough to inspect its receipt, logs and output before submitting a scientific workload.
For Slurm, obtain the correct account/partition, resource request, wall-time, module/environment setup and scratch policy from the cluster owner. Availability of sbatch, squeue, sacct and scancel supports scheduler operations; their presence alone does not establish submission permission.
Check a host before a research workload
| Stage | Check before moving on |
|---|---|
| Connection | A successful probe and authenticated connection. |
| Direct job | A small approved job, its exit status, readable log and retrieved output. |
| Slurm job | A scheduler receipt/job ID, the actual allocation, final state and retrieved output. |
| Recovery after reconnecting | The app reconciles the same remote job; it has not submitted a duplicate. |
| Cancellation | The scheduler/process confirms it has stopped; inspect retained outputs before cleanup. |
| GPU workload | The required environment, weights, memory and scientific output checks, in addition to SSH access. |
Source review: add-host form, authentication fields, host details, connection validation and session host selection.
Run a remote RNA-seq quality check
Run a remote RNA-seq quality check
Worked example Run RNA-seq quality checks through Direct SSH
Use the same public GSE60450 count matrix when moving an analysis from your laptop to a server. Comparing a known result helps distinguish a compute configuration problem from a change in scientific method.
- Create a conversation in the research project and attach the original count matrix.
- Open Agent controls → Compute. Enable the host, then add it to run targets. Availability and selection are separate controls; merely registering a host in Settings does not select it for this conversation.
- Ask for a Direct SSH job, name the input and required outputs, and specify limits. For this example, use one CPU thread, a 1 GiB memory ceiling and a 120-second runtime. The server's default Python is sufficient; no package installation is needed.
- When Allow remote job submission? appears, inspect Host, Intent, Inputs, Execution mode, Timeout and Remote workdir. Expand Show full command to inspect the entire script. Once approves this submission; broader scopes apply to subsequent operations. Choose a scope deliberately.
- Keep the returned Job ID. Open the job chip or Background tasks to inspect that job. You can leave the conversation while it runs; avoid submitting another copy just because the response has ended.
- After completion, open Remote job details. Check Status, Runtime, Job ID and Remote workdir. Use Refresh for the current view, and stdout or stderr to inspect each log. The remote-workdir button opens the job's remote directory.
- Wait for result collection and the follow-up response, then open the published CSV and report. Successful computation, file collection and Artifact publication are separate stages. A completed job does not by itself establish that both expected files were published.
Example request:
Run descriptive QC on the attached GSE60450 count matrix using the selected Direct SSH host. Preserve the input. For each sample, calculate total counts, zero-count genes, detected genes and the median positive count. Save a CSV and a short methods report with dimensions and before/after SHA-256. Use one CPU thread, no package installation and a 120-second runtime limit. Return the job ID after submission; collect and publish the outputs when it finishes. Do not normalize counts or make biological conclusions.
After success and exit code 0, confirm that the app collects both outputs and that the saved table and report reopen. Compare full sample identifiers and metrics with the shared baseline, and check the input hash before and after the remote computation. This Direct SSH example passed those checks.
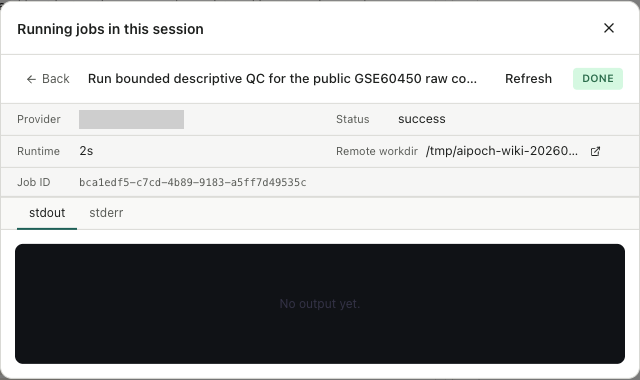
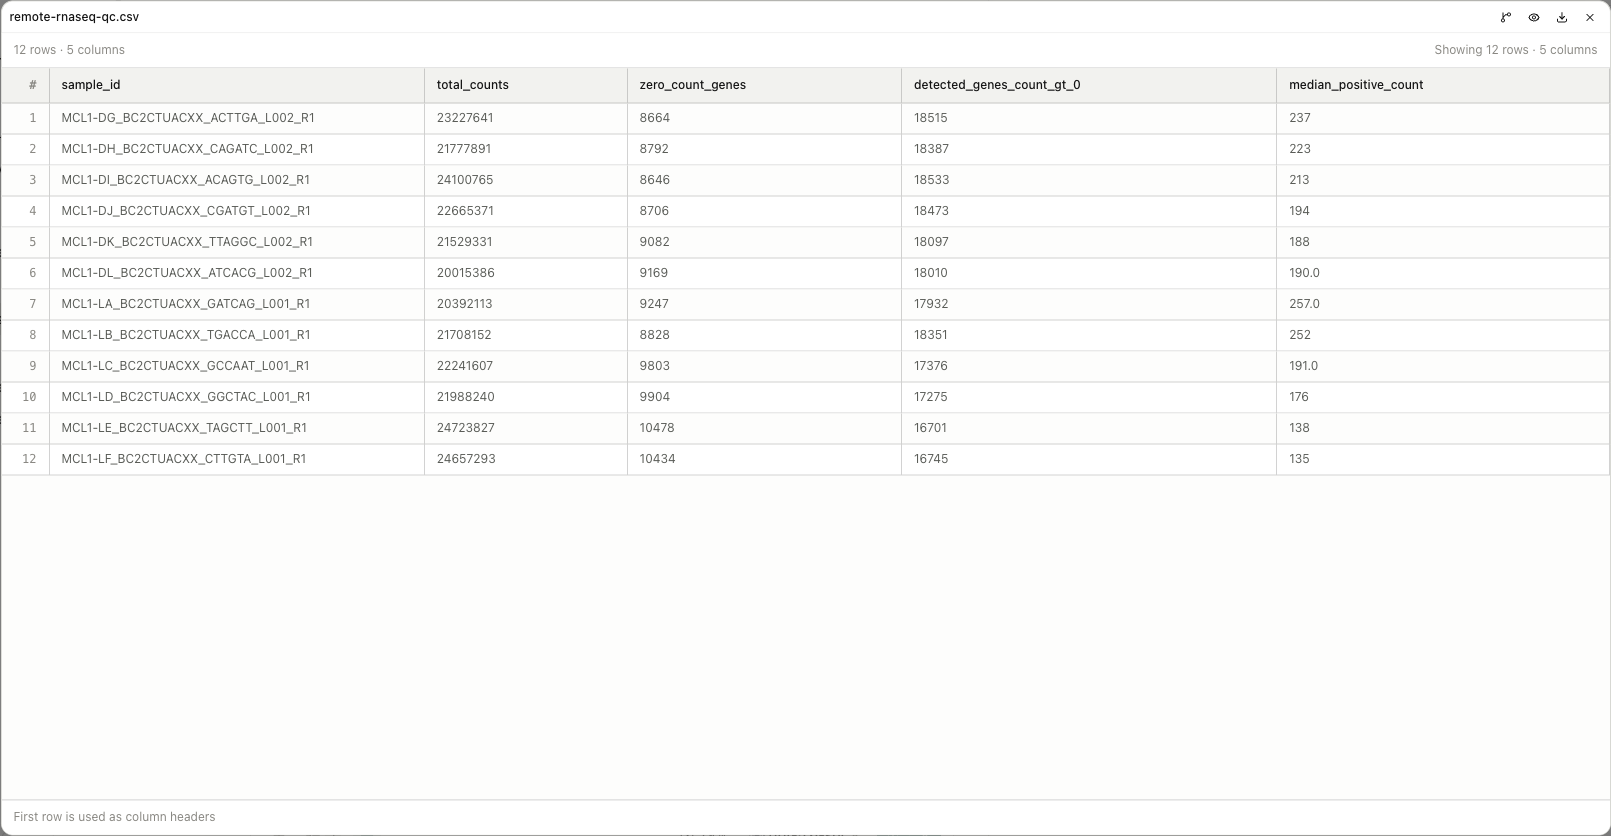
Download the example QC table and methods report. These raw-count checks do not replace normalization, experimental-design review or differential-expression analysis. The positive-count median excludes zeros.
Return to a job after restarting the app
Open the same project and conversation, then use Compute or the job's Background tasks entry. Compare the Job ID with the original receipt before taking action. A restored job is the existing remote workload; starting a new conversation or resending the prompt is not a recovery step.
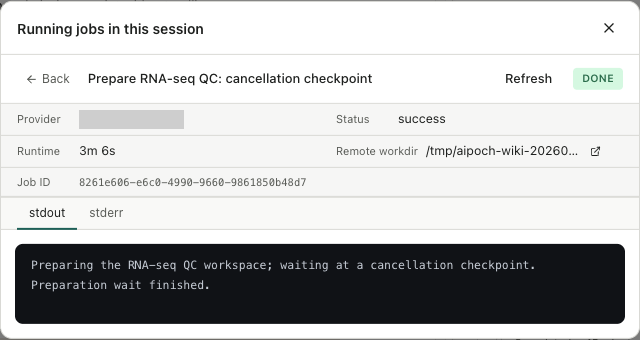
The separate preparation checkpoint shown below was running when the local app restarted. The app recovered the same job ID and later collected its completion log. The wait finished normally; this screenshot demonstrates recovery, not cancellation or a scientific computation.
Cancel one remote job
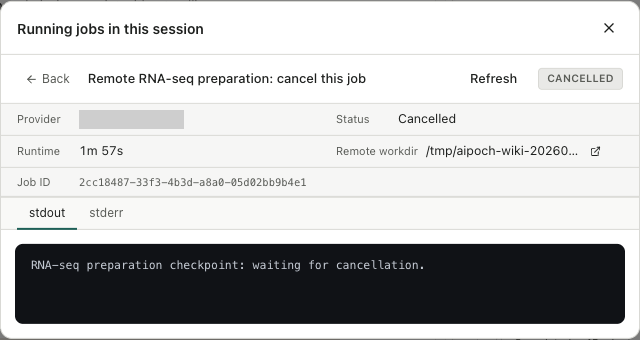
Open Background tasks, select the intended job and compare its Job ID with the receipt. Back returns to the session's job list. Select Cancel in that job's detail view, wait while the button shows Cancelling, then use Refresh to confirm Cancelled. Closing the detail dialog or ending a conversation response does not cancel the remote workload.
The preparation checkpoint below was cancelled through this control. The remote process was independently confirmed absent afterward. Its existing log remained readable. This does not imply that a cancelled analysis produced a complete result; inspect retained files before using them.
Submit through Slurm and check the allocation
- Open the host in Settings → Compute, choose Execution mode → Edit → Slurm → Save, and reopen the setting to confirm it. Detected scheduler alone does not select the mode.
- Enable and select the host in the intended conversation. Confirm the site's partition/account and readable scheduler accounting before running a long analysis.
- Request resources using one
#SBATCH --option=valuedirective per line. This example used:
#SBATCH --partition=local
#SBATCH --cpus-per-task=1
#SBATCH --mem=1G
#SBATCH --time=00:03:00
Use your site's partition rather than copying local unconditionally. The job's 120-second workload timeout is separate from the scheduler's three-minute allocation limit; neither determines how soon a queued job starts. The application manages the job name, working directory and stdout/stderr paths.
- Preserve both the app Job ID and scheduler_job_id. The scheduler ID can arrive after the initial submission receipt; ask the agent to read the saved job's status. Do not submit again merely because that first receipt lacks the scheduler ID.
- Compare the requested resources with the actual allocation. The example requested one CPU per task and 1 GiB; Slurm recorded one task and two allocated logical CPUs. Use the scheduler's allocation record when explaining resource use.
- Wait for a confirmed terminal state and collected files before publishing the result. A server-side output file does not establish that the application has harvested it.
When the server completes but the app keeps waiting
If the app snapshot reports last_poll_error, retain the existing job ID and ask for the exact error. The observed accounting failure was:
slurm_poll_failed: Slurm accounting storage is disabled
If the scheduler shows COMPLETED / ExitCode 0:0 but the app still shows submitted, result_final false or no collected files, keep both job IDs and inspect the polling error. Treat scheduler completion and application result collection as separate stages.
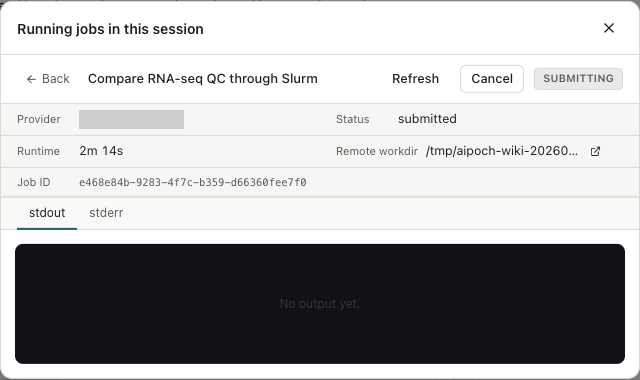
Ask the cluster administrator to provide working sacct accounting for the account and job. squeue no longer listing a job is insufficient evidence of success. Keep the existing work directory and job IDs while accounting is repaired, then inspect the same job again. Do not resubmit a completed analysis to clear a monitoring error. Slurm cancellation, recovery and application harvest remain pending until this environment requirement is resolved.
Run a small protein sequence design on GPU
Run a small protein sequence design on GPU
Worked example Design one ubiquitin sequence with ProteinMPNN on GPU
Use the public 1UBQ ubiquitin structure to generate one chain-A candidate with ProteinMPNN. This checks remote GPU execution and output inspection. It neither predicts a new structure nor establishes ubiquitin function.
- Select the connected host in Compute. Check free GPU memory and current load, and confirm that direct execution of a small task is permitted. On a scheduler-managed cluster, use an authorized partition and account.
- Ask the agent to prepare an isolated environment and retain the Python, PyTorch/CUDA and dependency inventory. The example used Python 3.10, PyTorch 2.5.1+cu124 and NumPy 1.26.4. The host's original Python had CPU-only PyTorch; detecting a GPU alone was insufficient.
- Pin the official ProteinMPNN checkout and its included
v_48_020weights. Record SHA-256 for the downloaded 1UBQ structure and weights. - Specify chain A, one candidate, batch size 1, temperature 0.1, seed 42 and a 180-second execution limit. Inspect the remote command shown by the app before approving that operation.
- Require stdout/stderr, exit status and the model's parameter device.
CUDA available=Truealone does not prove the inference used GPU. This run recordedparameter_device=cuda:0andparameter_is_cuda=True. - Inspect the generated FASTA. Independently check length, amino-acid alphabet, matches to the native chain and finite scores, then verify the input hash again.
| Check | Result in this example |
|---|---|
| Device | NVIDIA A100 80GB PCIe; model parameters actually on CUDA |
| Input/output length | Native chain A and candidate both 76 residues |
| Alphabet and scores | Standard 20-amino-acid alphabet; finite score/global score of 0.8568 |
| Native matches | 42/76; independently recomputed recovery 0.5526316 |
| Execution | Model and independent validation exited 0; model-reported generation time 0.1949 seconds excludes setup and the complete task |
| Input integrity | Identical structure SHA-256 before and after |
Download the GPU verification record. The device's 80 GB capacity is not a minimum requirement for this small task; peak memory was not measured. Remote logs and files do not automatically provide complete local Notebook provenance.
This example used an approved direct SSH command. An earlier Slurm submission returned InvalidAccount, so this result does not verify a Slurm GPU job. Check partition/account authorization when that error occurs; do not change scheduler services or bypass a required queue.
Resolve SSH and job errors
Read both the code and its message. A connection error, a scheduler rejection and a failed program need different fixes. The identifiers below describe connection and compute job states; the interface may show a descriptive message instead of the raw code.
Connection and remote files
| Message or identifier | Meaning | Next action and success check |
|---|---|---|
The SSH host key is unknown. Verify it in a terminal before connecting. | The system SSH client has no trusted key for this host and port. | Verify the fingerprint with the administrator, establish host trust in the system SSH client, then retry Add or Test and save. Do not disable host-key checking. |
Permission denied (publickey) | SSH key authentication failed; the remote-file classifier treats this as connection. | Check User, Identity file, host alias and ssh-agent. Confirm that the administrator authorizes that key. Use Test and save, then Retry probe. |
Connection refused / No route to host / connection timeout | The SSH transport cannot reach or establish the connection. | Check host, port, network/VPN and server availability. Retry the connection after correcting the cause. |
ENOENT / not_found | The requested remote path does not exist. | Check the path on the remote host, not your laptop; open the correct directory or file. |
EACCES / EPERM / permission | The connected account cannot perform that filesystem operation. | Ask the host administrator to confirm access or select an authorized scratch directory. Retry the same operation. |
outside_roots | Remote-file path validation rejected a non-absolute path or control characters. | Supply an absolute remote path without line breaks/control characters. Check the full error if another layer rejected the path. |
Job records
| Error code | Meaning | Next action |
|---|---|---|
approval_denied | The requested operation did not receive approval. | Review the intended command and scope. Submit a new request only if you want to authorize that work. |
host_unreachable | The app could not reach or confirm the host operation. | Restore connectivity and probe the host. If submission may have occurred, check for an existing remote job before retrying. |
invalid_resources | Resource arguments or Slurm directives failed validation. | Read the named field/directive. Follow the accepted resource format, cluster limits and any app-managed directive restriction. Retry after correcting that field. |
dispatch_failed | Launch or scheduler submission failed. | Read stderr and any sbatch message. Check the partition/account, environment and command. Check for a scheduler receipt before submitting again. |
job_failed | The job finished unsuccessfully. | Read its exit code and stdout/stderr, fix the program or environment, then run a small test. |
timeout | A connection, command or job exceeded a limit; this code can also accompany invalid timeout_seconds. | Use the accompanying message to distinguish invalid input from elapsed time. Check the existing job state before changing the limit or rerunning. |
process_vanished | Tracking or recovery could no longer find the expected process. | Inspect the remote work directory, logs and scheduler history. Establish whether the work stopped or completed before creating a replacement job. |
last_poll_error is a monitoring error, not by itself the job's final status. Likewise, harvest_error means result collection needs attention; computation may already have finished. Preserve the job ID, restore connectivity and inspect the existing job before starting another copy.
A successful recovery should show the intended job's final state, an interpretable exit status and accessible output. For Slurm, check the scheduler job ID as well as the app job ID. If the error persists, follow Report a bug or ask the community; include execution mode, both IDs when available, the full error and a sanitized log excerpt.
For SSH key/config authentication, supply a usable key or host alias and verify the connection before submitting. Slurm result collection requires working accounting for the selected account; follow the checks above if the app cannot settle the job.
Sources: compute job codes and record fields, SSH/file error classification, Slurm submission validation.