First-time setup
The first-run wizard has five pages in this order: Environment, Data location, Agent runtime, Model provider, and Notebook runtime. Back and the primary action at the bottom move between pages. The primary action remains unavailable until the current page meets its requirements.
After initial setup, an older app-managed Codex runtime can be updated in Agent settings. This is separate from choosing a model provider.
1. Environment
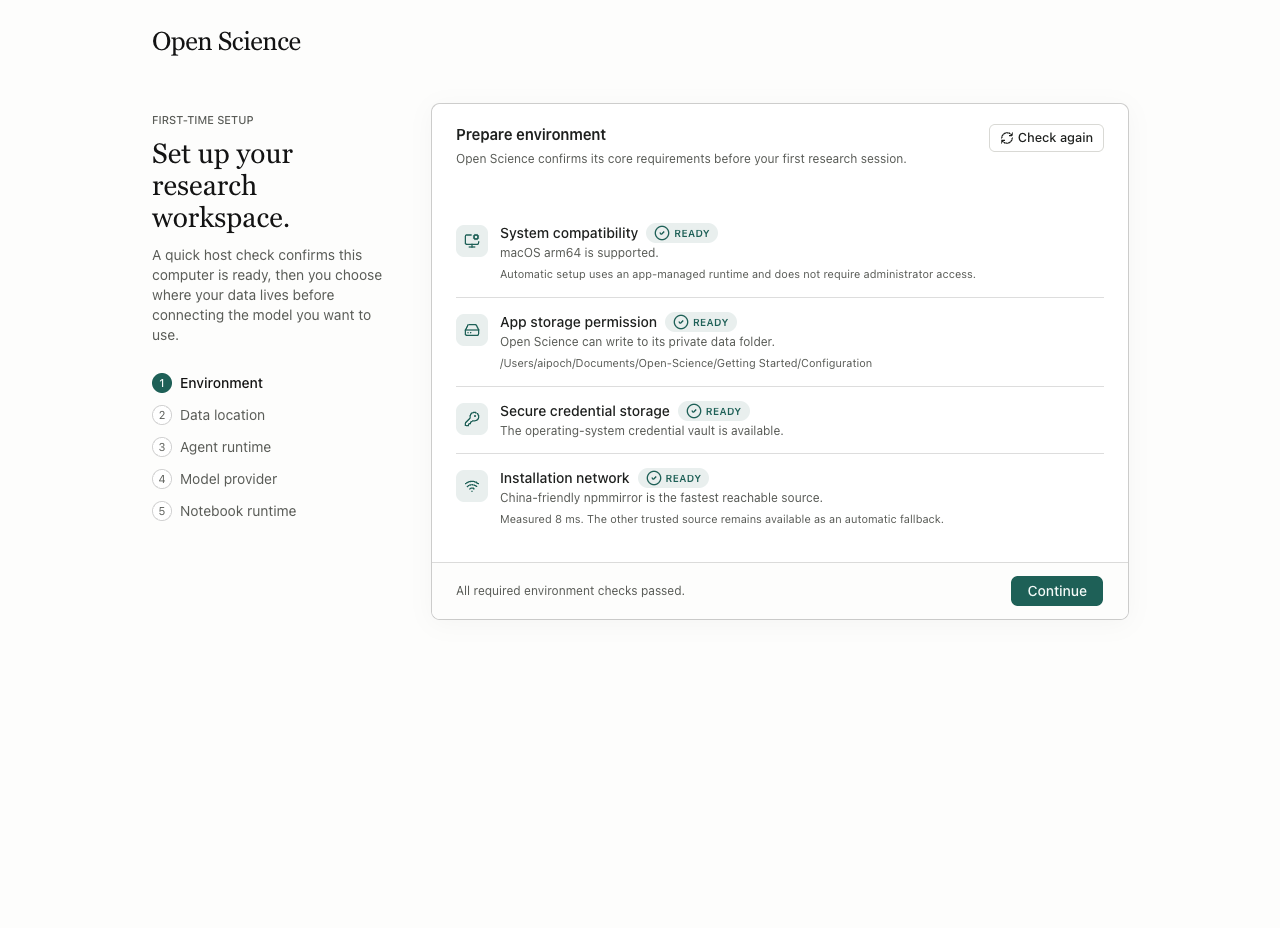
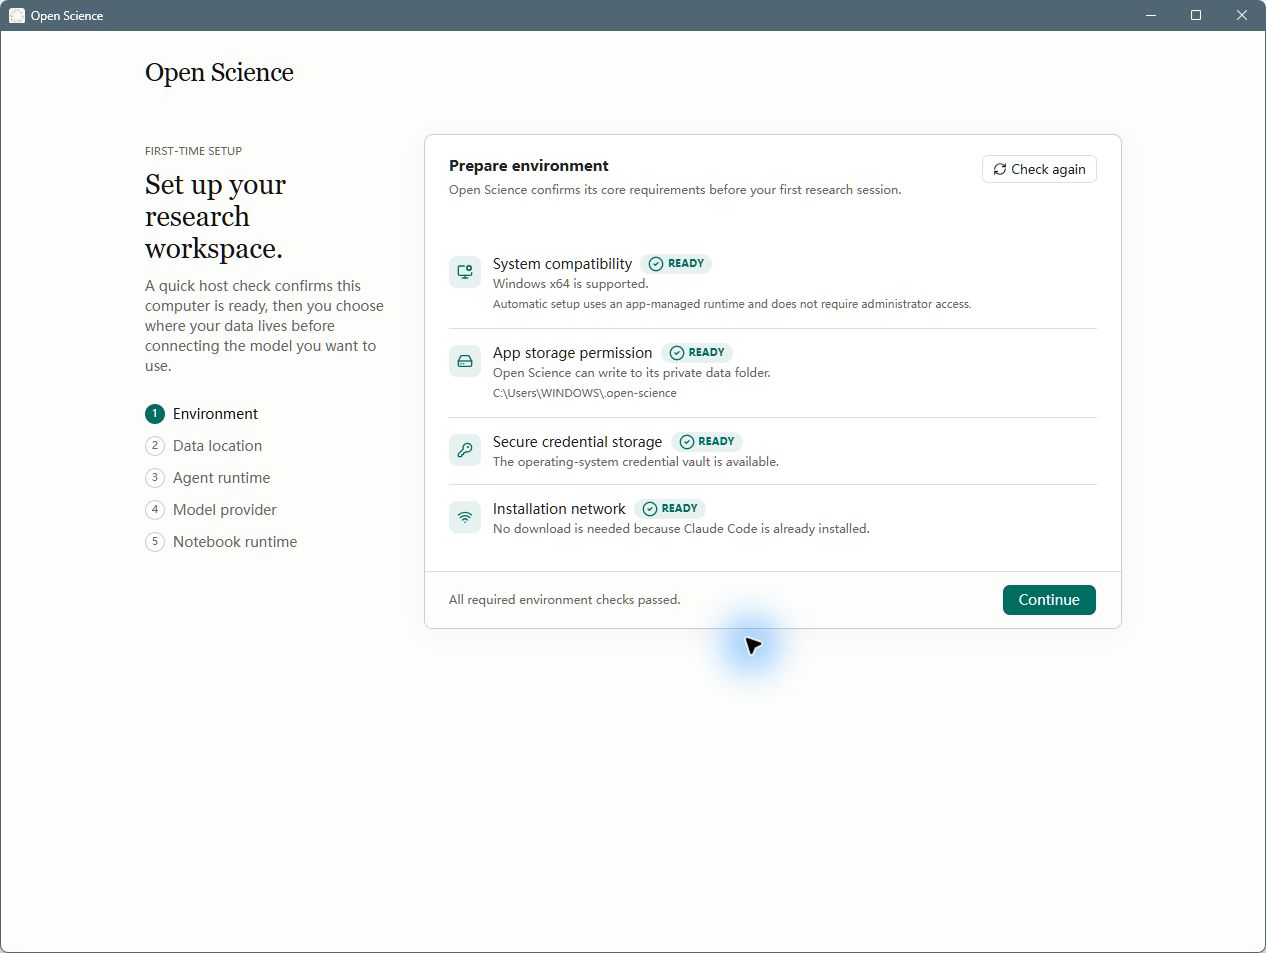
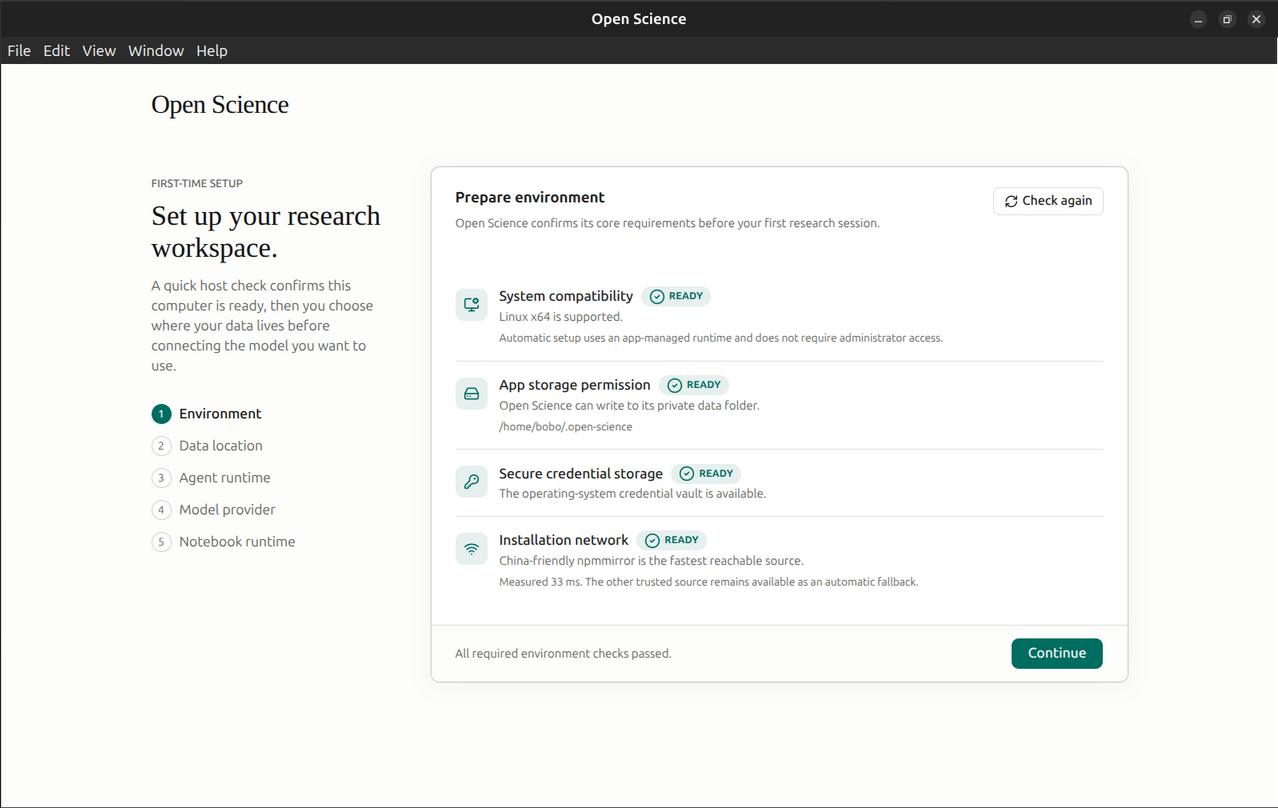
Start on Prepare environment. The app checks the host before asking you to install an agent or connect a model. Each row contains a status and an explanation; use the explanation to identify the requirement that needs attention.
| Check or control | What it means | What to do |
|---|---|---|
| System compatibility | Checks the operating system and architecture | Confirm that the detected platform matches your computer |
| App storage permission | Checks write access to the app's configuration folder | If it fails, resolve access to the displayed path and check again |
| Secure credential storage | Checks whether the operating-system credential vault is available | Resolve the vault issue before entering credentials |
| Installation network | Checks supported package sources and reports a reachable source | Read the selected source and latency; results depend on your network |
Check again | Repeats the environment checks | Use after fixing a requirement; the label becomes Checking… and the button is disabled during the check |
Continue | Opens Data location | Available after the required host checks pass; it is disabled while checks are running |
Open the Environment step, read all four rows, select Check again, and wait for All required environment checks passed. Then select Continue. This environment check does not require an API key or a paid model call; model authentication is configured later.
Choose a stable data location with enough free space. The operating system may display native folder dialogs in its own language even when the application uses English.
Read each check’s explanation alongside its status. When an agent is already installed, the installation-network check may require no download; it does not confirm access to every external service.
2. Data location
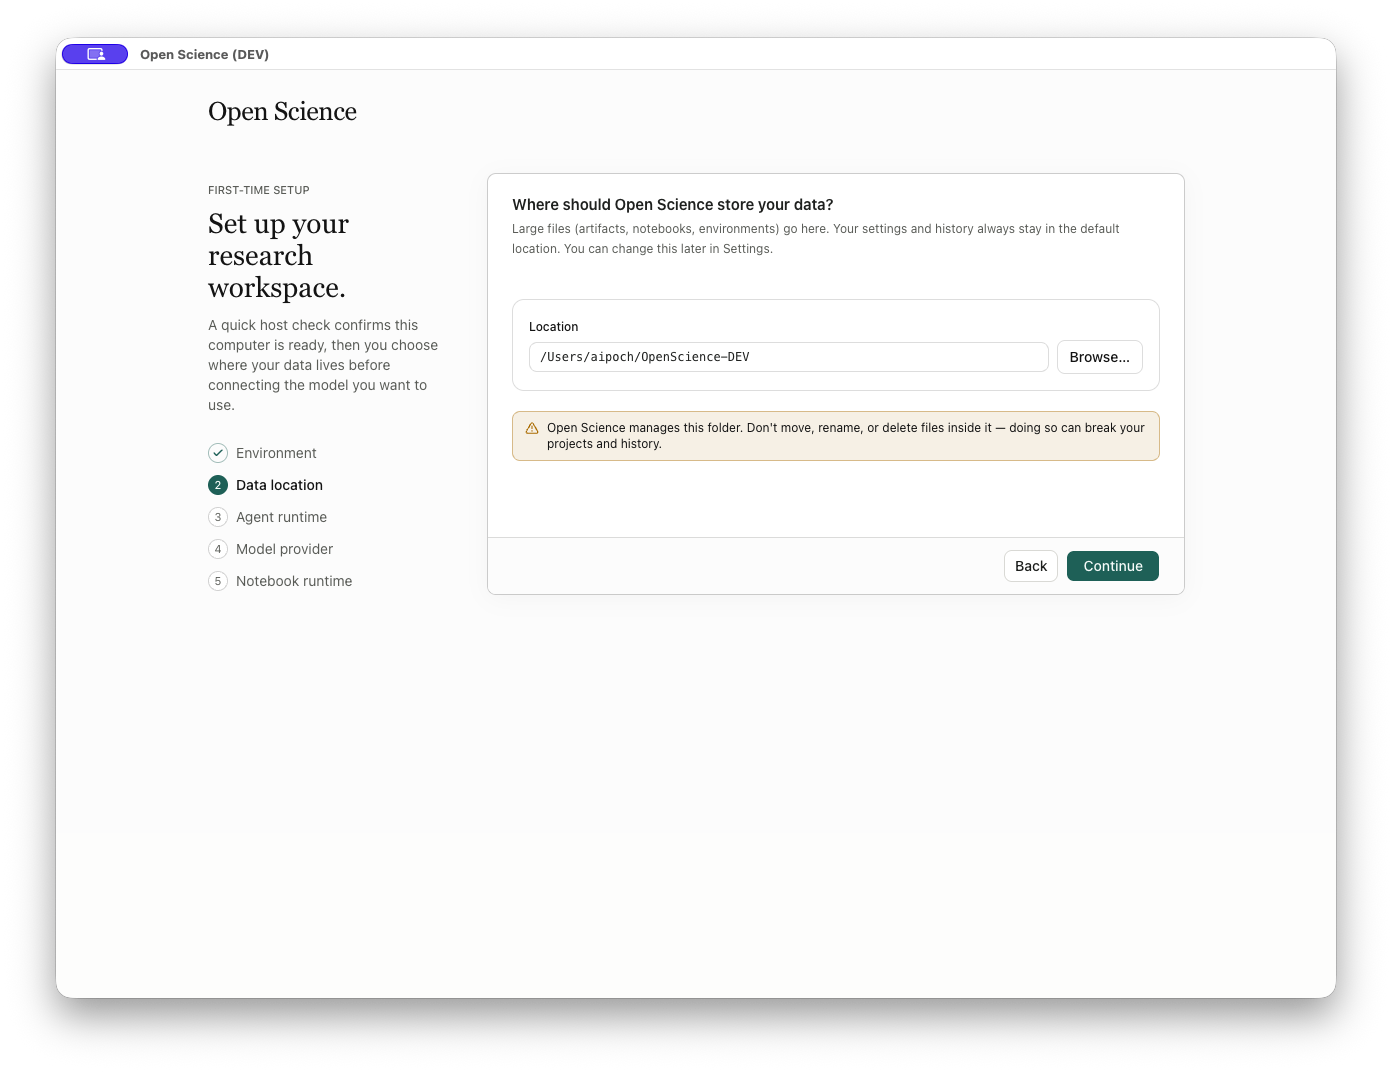
Choose the location for large files before installing runtimes. Artifacts, notebooks, and environments use the data location; settings and history remain in the configuration location. The displayed path is a read-only summary, not a text field.
| Control | Action and result |
|---|---|
Location / data location path | Displays the effective default or your proposed data folder |
Browse… | Opens the system directory picker. Choose a parent folder; inspect the final app-managed path after returning |
System picker Cancel | Closes the picker without replacing the current choice |
Use default location instead | Appears after a custom choice; clears that choice and its related errors |
Back | Returns to Environment |
Continue with the default location | Advances to Agent runtime |
Continue after choosing a custom location | Opens Restart to set up your data?; does not silently activate the new folder |
Retry | Appears if the default-location information could not load; tries that read again |
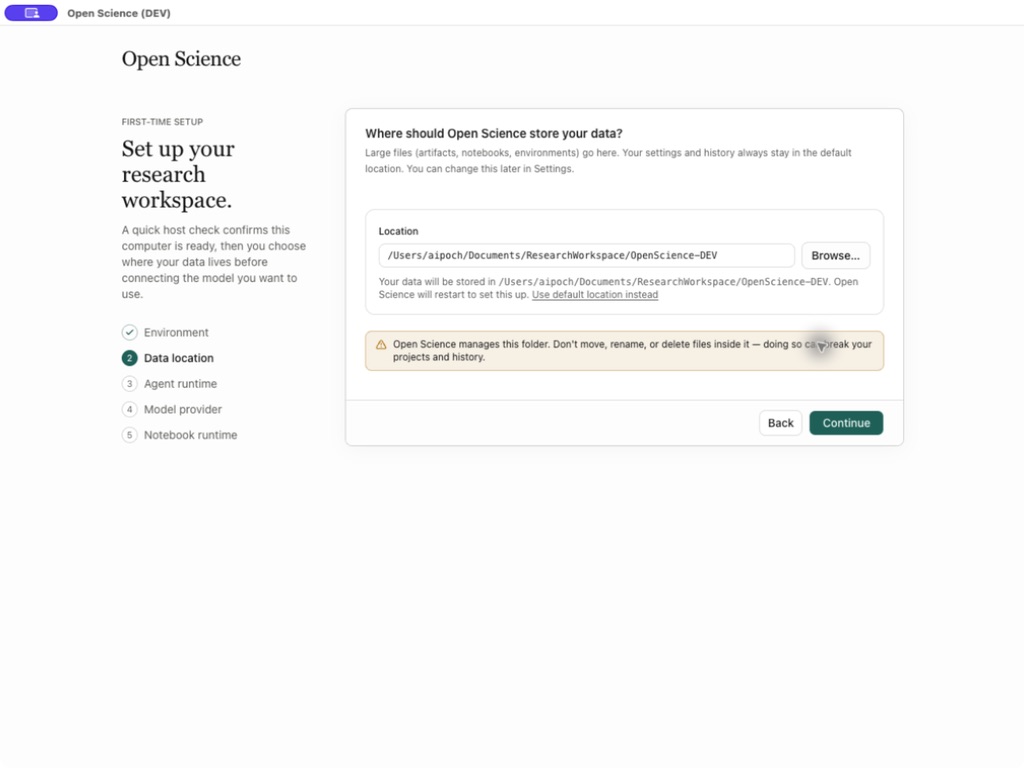
Select Browse…, choose an empty parent folder on a disk with enough space and inspect the complete managed path shown by the wizard. Select Continue and read the restart confirmation. Use a stable research-data location rather than a temporary folder.
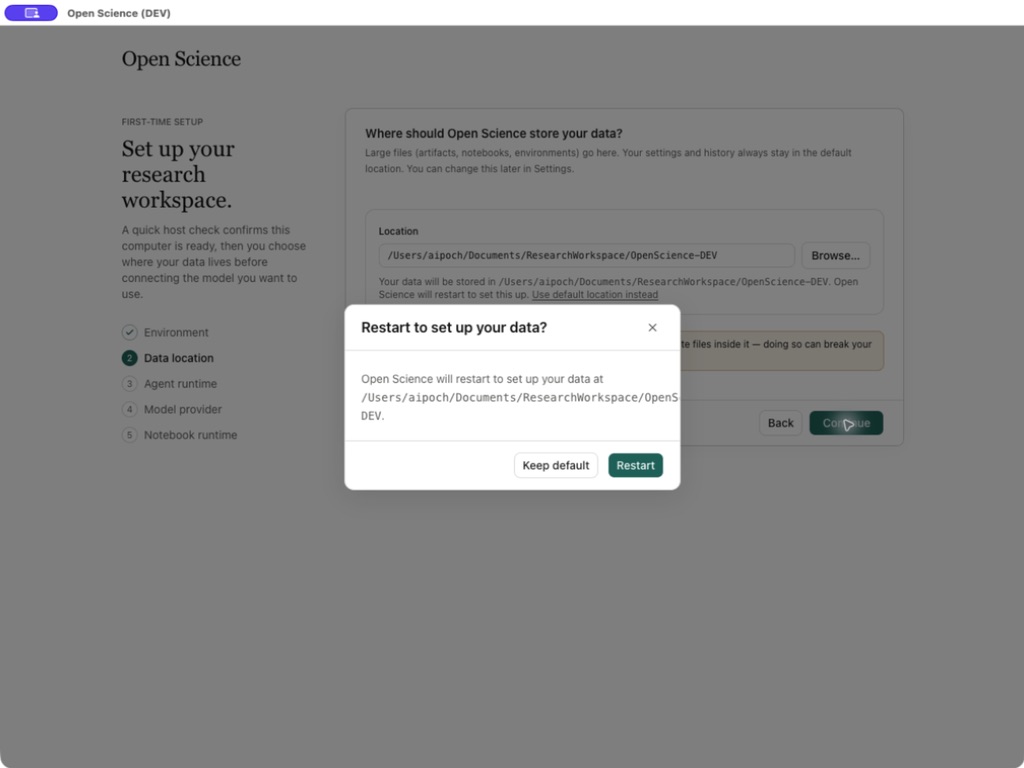
| Confirmation control | Result |
|---|---|
Close (×) | Returns to Data location and retains the proposed path |
Keep default | Clears the proposed location and advances using the default |
Restart | Activates the selected data location and relaunches the app; the wizard resumes at Agent runtime |
The app inspects the folder before accepting it. An existing recognized data folder can be adopted in place; the page explains that nothing is moved. An unusable selection displays an error. If activation or relaunch fails, the page can show an error and offer retry or the default location. Do not manually move or rename the app-managed folder.
Adopt an existing data folder
- Choose Browse… and select the parent containing a recognized app-managed data folder.
- Confirm This folder already contains Open Science data — it will be used as-is (nothing is moved). Check the complete destination, then choose Continue → Restart.
- After relaunch, the wizard resumes at Agent runtime. The selected data location is retained; continue the remaining setup steps.
After adoption, reopen representative files to confirm the expected data is present. Adoption changes large-file storage; it does not import another installation’s settings, conversation database or credentials. Keep default clears the proposed location and continues with the previous effective location.
Recover when the location cannot be saved
If the page reports Could not finish setting up storage: EACCES: permission denied, inspect the path in the error. The configuration directory also needs to be writable; choosing a writable data destination alone may not resolve it. Restore access to the affected app-owned configuration location, then retry the operation or select Use default location instead → Continue.
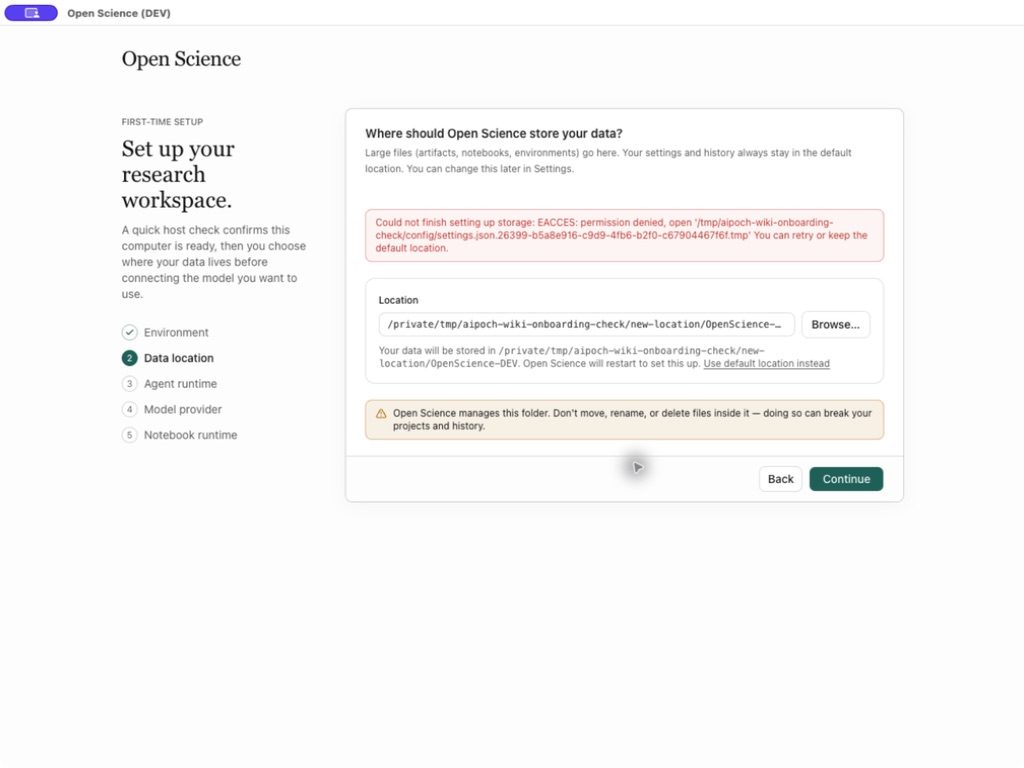
If restart fails before the location changes, restore configuration write access and reopen the wizard. Check the active path and existing files before retrying a move; see Storage.
3. Agent runtime
Choose the coding-agent backend that will run sessions. Select a detected installed framework or install an app-managed copy. Continue after its status reports ready.
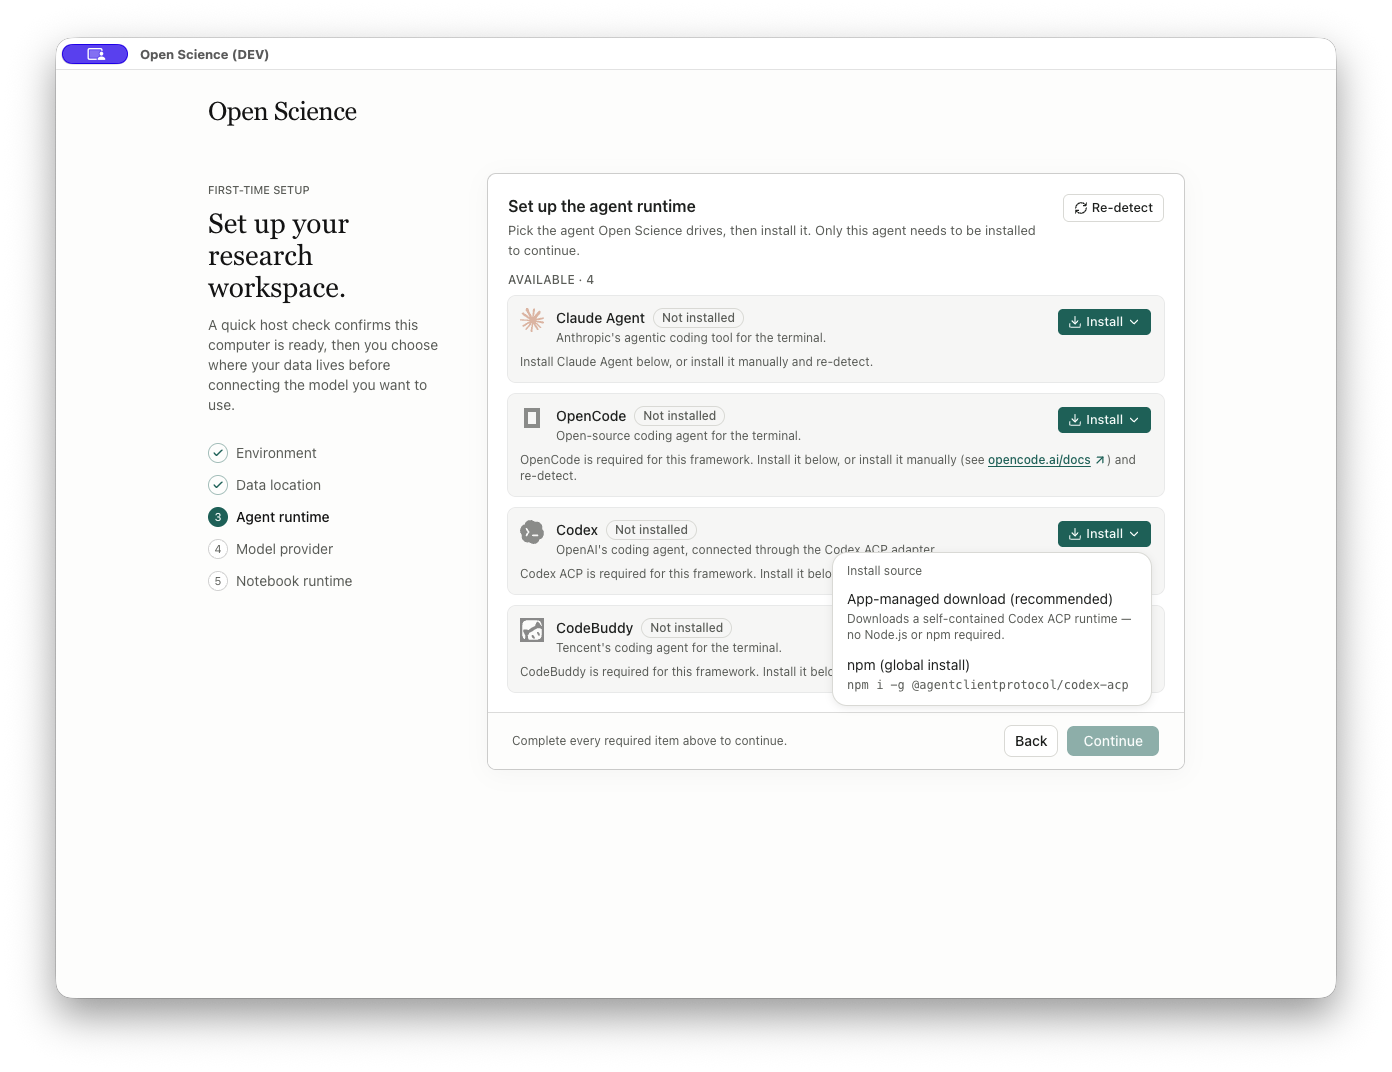
- Open Install Codex.
- Choose the app-managed installation source recommended by the menu. The alternative uses a global npm installation.
- Wait for installation to finish. Avoid starting another installation while the installer is running.
- Confirm that Codex now shows its version and Active.
- Select Continue to open Model provider.
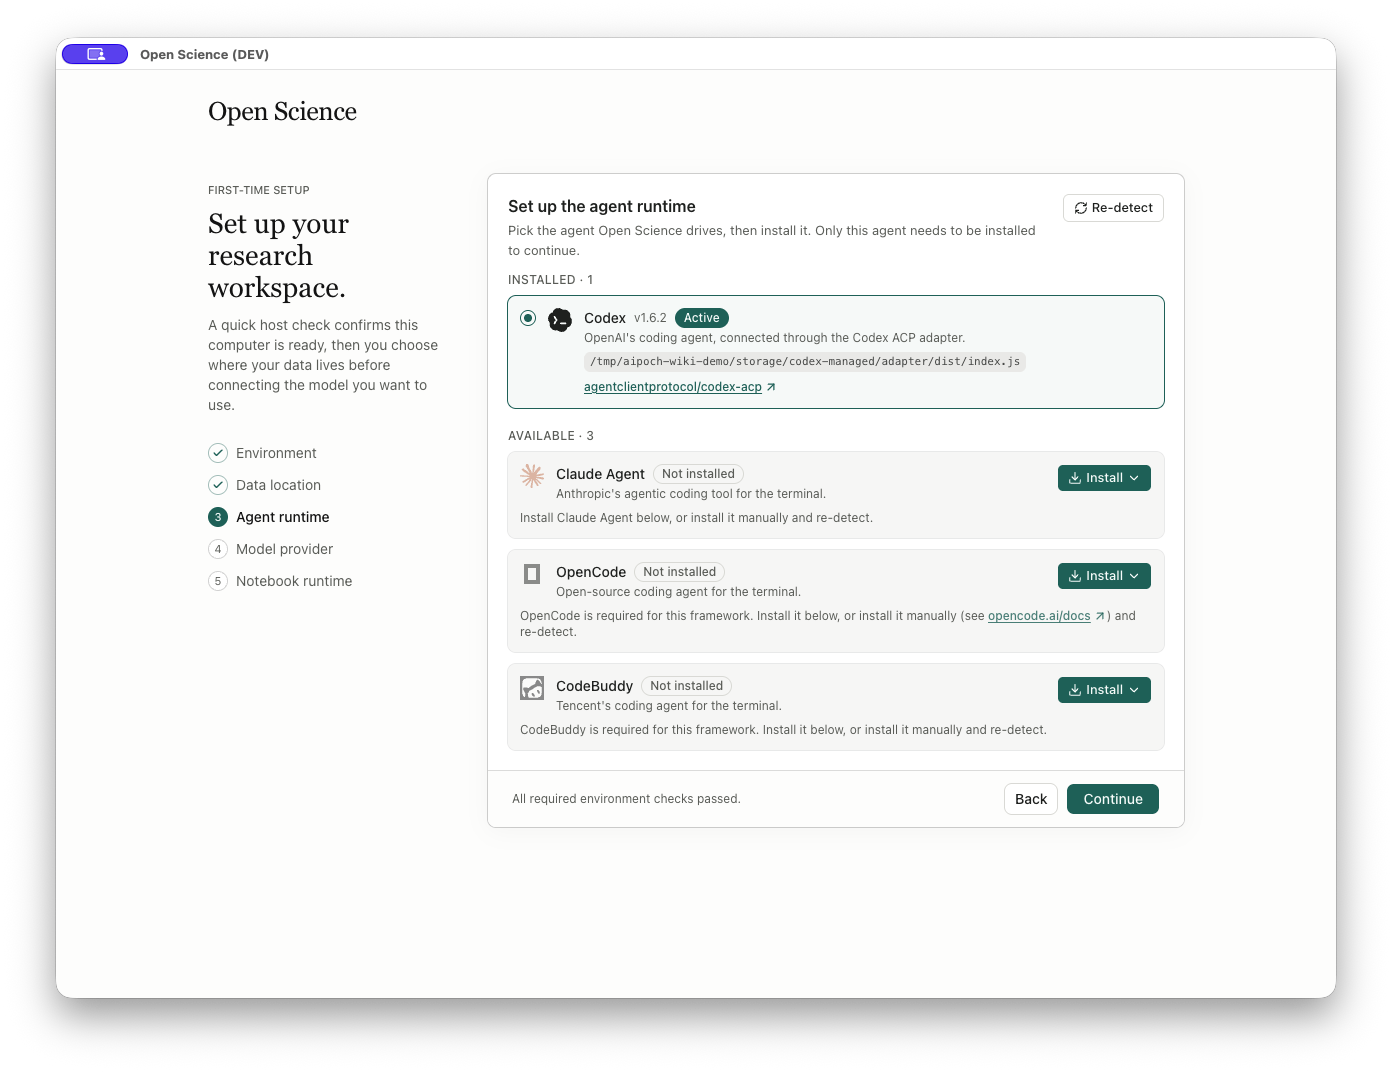
The version labels identify the installed agent or adapter, not the selected model. Inspect the installed values instead of expecting the screenshot’s exact versions.
If a compatible agent is already installed, select its card and confirm Active before continuing. The Windows screen below uses an existing Codex installation; reinstalling it is unnecessary just to proceed through the wizard.
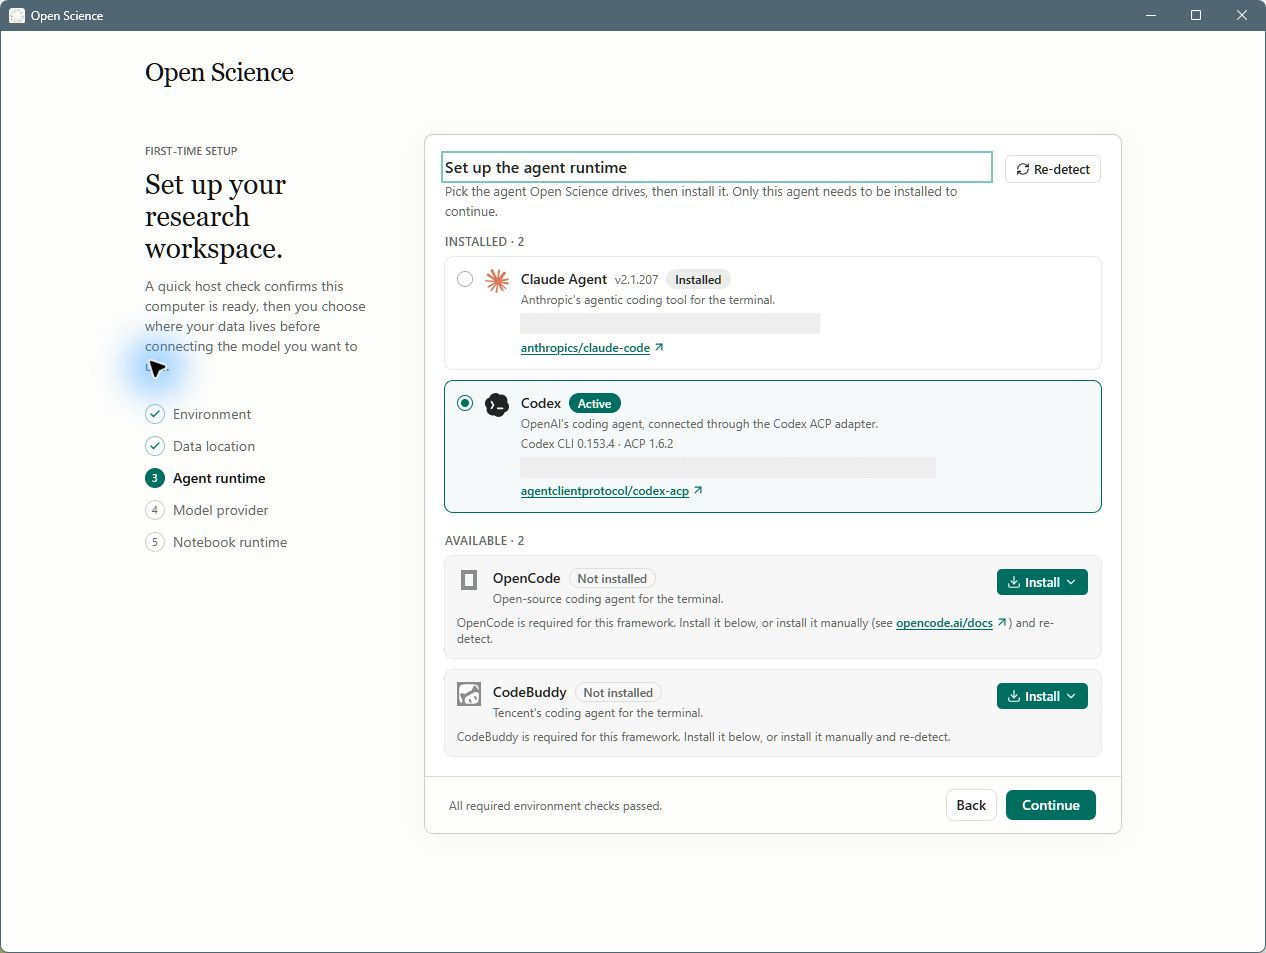
| Control or state | Behavior |
|---|---|
| Framework card | Shows installation status, version, runtime path, and whether the framework is active. |
| Install… | Opens that framework's supported installation sources. |
| Installation progress | Reports setup activity; conflicting installation controls and re-detection are unavailable while it runs. |
| Re-detect | Refreshes installed runtime information. The label becomes Detecting… until checks finish. You can also re-detect from Settings → Agent. |
| Uninstall | Unavailable for the active runtime. Switch to another installed framework before removing it. |
| Back | Return to Data location when no blocking setup operation is running. |
| Continue | Proceed once an active runtime is ready. |
See Agent frameworks for framework-specific installation, switching, repair and removal.
4. Model provider
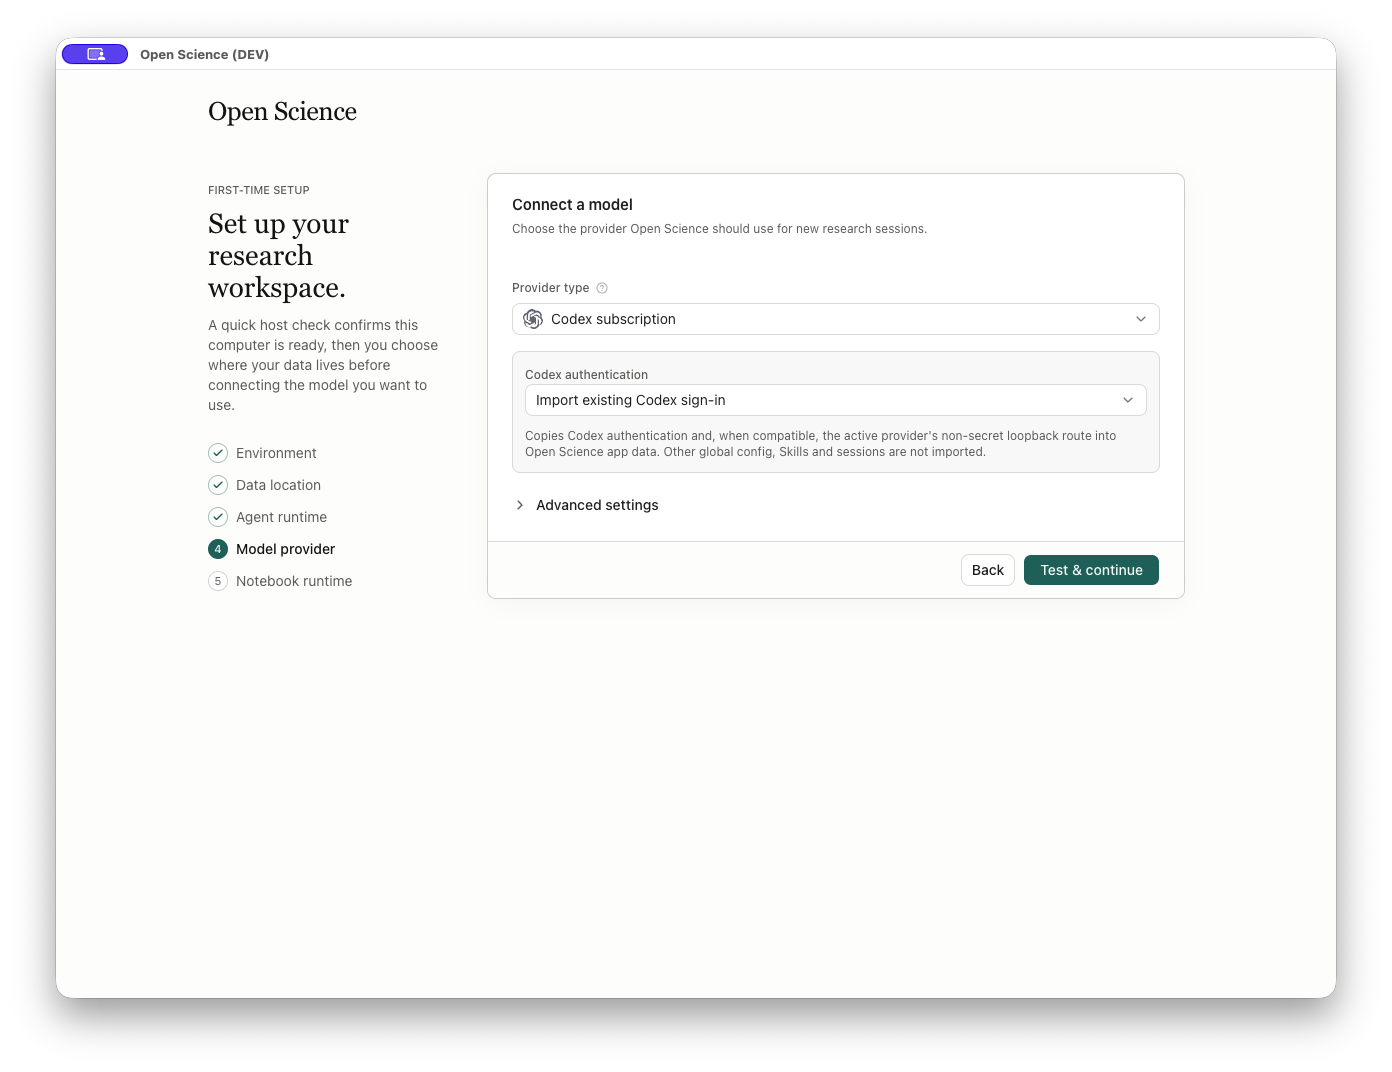
The form changes according to Provider type, the selected agent, and the authentication method. For a Codex subscription, Import existing Codex sign-in copies an existing local sign-in to Open-Science. Use it when you want to connect that account, then wait for the connection check.
For an API provider, select its type, enter the endpoint and model details required by that provider, and use Test & continue. The wizard validates required fields before sending a test. A successful test advances the wizard; a validation or connection error remains visible for correction.
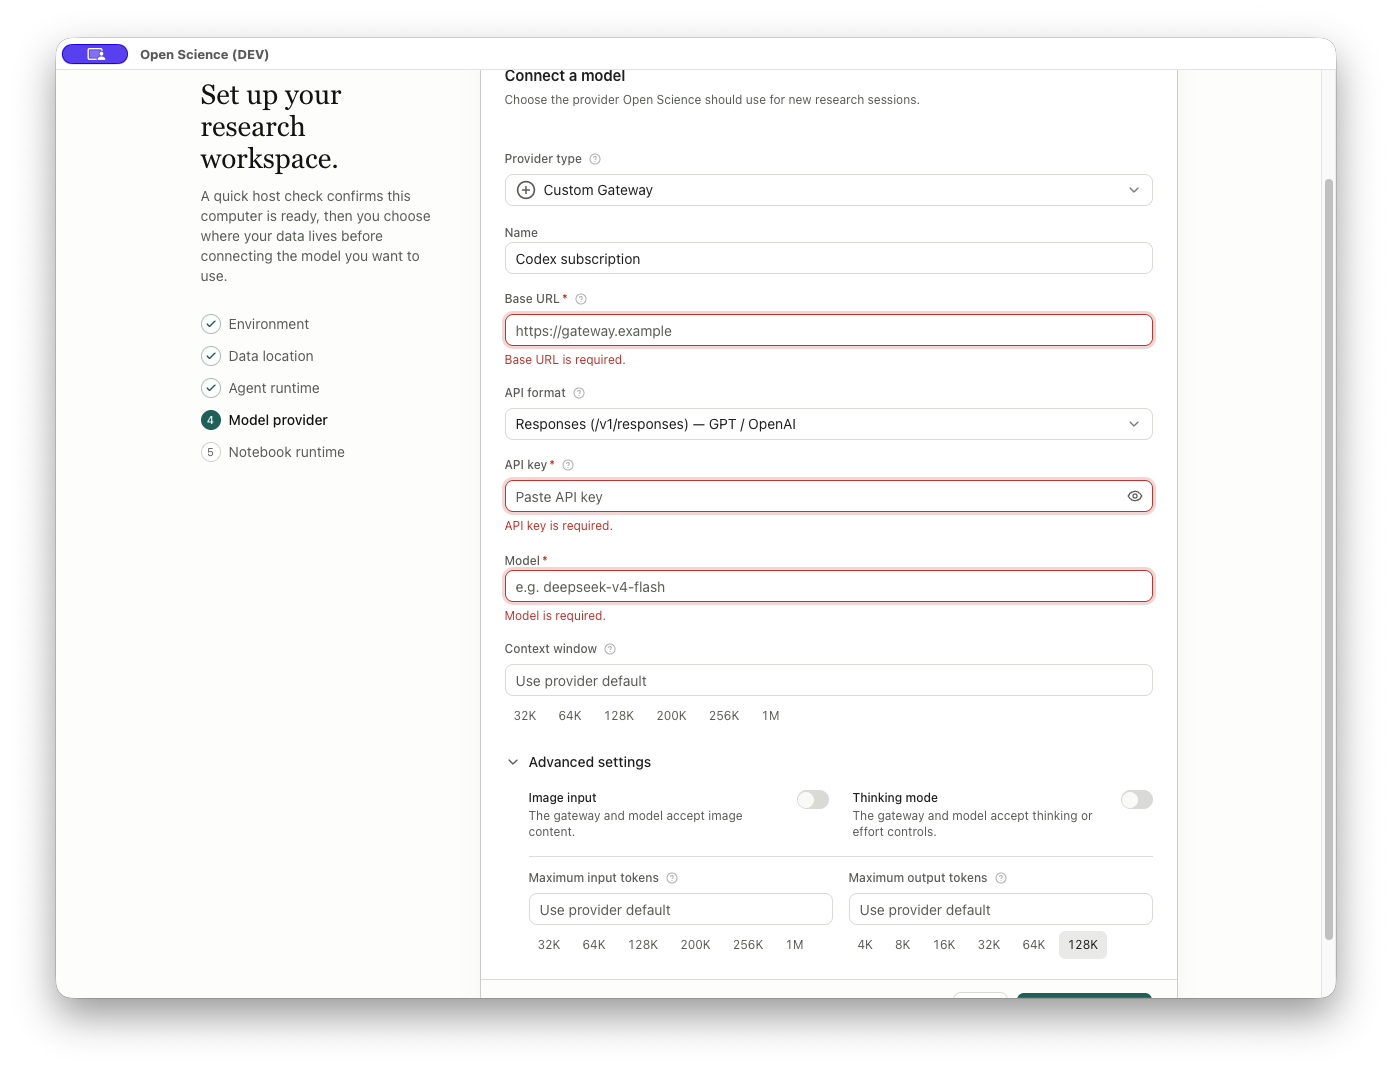
See Provider setup for authentication choices, advanced fields and recovery from connection errors.
Keep API keys in the dedicated credential field. Do not include them in screenshots, project instructions, or conversation messages.
5. Notebook runtime
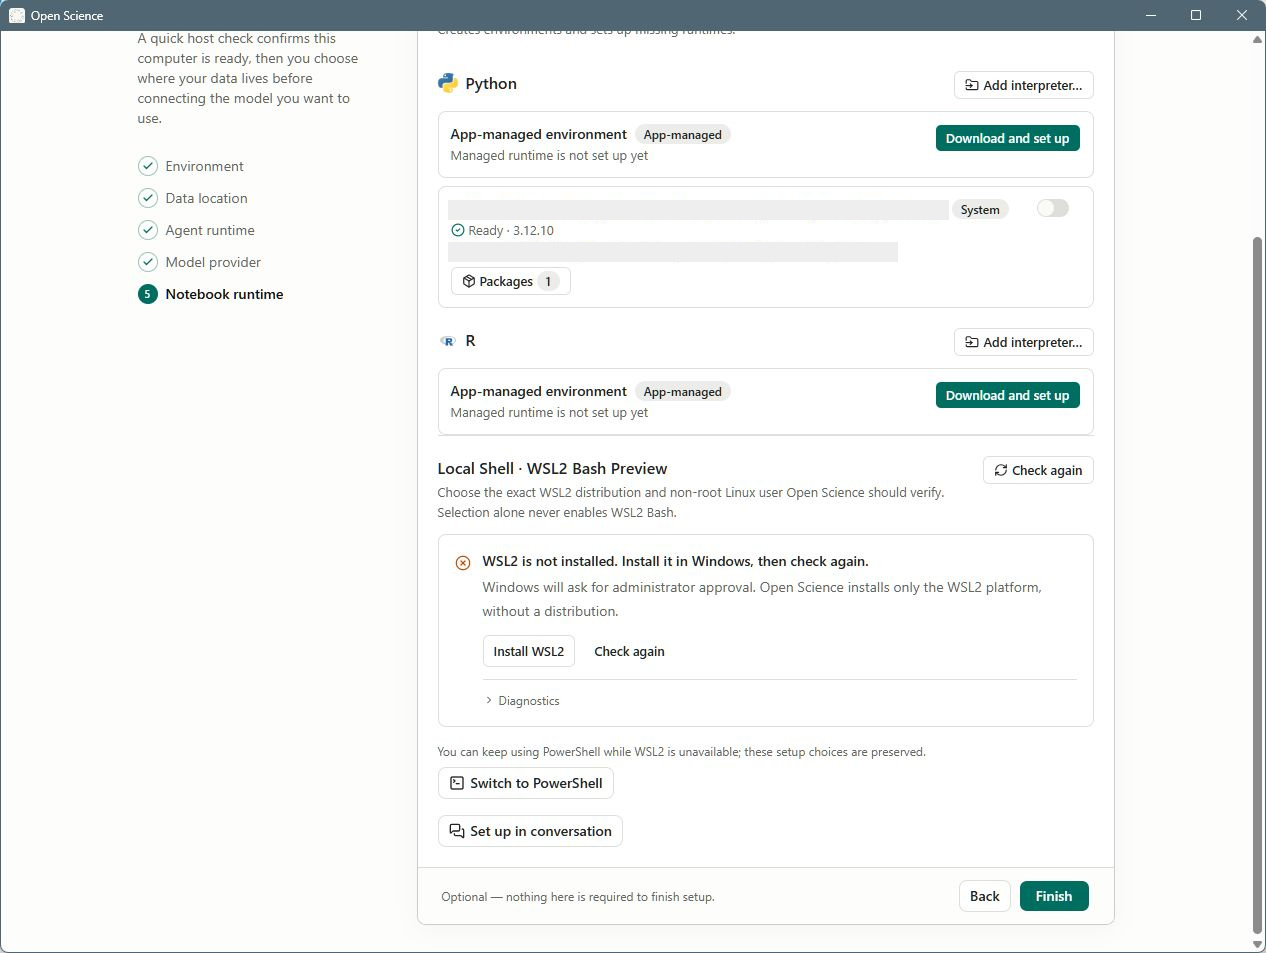
This optional final page reuses the complete Settings → Runtimes interface. By default, notebooks use app-managed Python. You can select a detected interpreter or prepare another environment later.
| Wizard control or state | Behavior |
|---|---|
| Back | Return to Model provider. Disabled during runtime provisioning or while finishing setup. |
| Finish | Save onboarding completion. Notebook setup is optional, so a ready custom interpreter is not required. |
| Setup already in progress | Wait for it to finish or cancel the setup before leaving; Back and Finish are disabled to avoid leaving a partial environment. |
| Completion error | Displays the failure and permits another attempt. |
After Finish, confirm Home opens, then use First project to save a small result. Reopen the application and check that the project remains available. If setup reappears, inspect the data location and configuration-write error before creating another profile.
The Windows Notebook runtime page can also show Local Shell · WSL2 Bash Preview. Read Optional — nothing here is required to finish setup. You can choose Finish while Python/R setup is deferred and WSL2 is unavailable. Prepare the required runtime before requesting code execution; completing the wizard does not install those optional environments.
Final setup checklist
| Check | Expected evidence | If it fails |
|---|---|---|
| Environment | Required checks passed. | Recheck after resolving the displayed requirement. |
| Data location | Final managed path is the intended location. | Return to the location page; do not infer the final path from the picker alone. |
| Agent | Installed version and Active state. | Inspect installation logs and redetect. |
| Provider | Verified connection and a selected main model. | Recheck sign-in or provider-specific fields. |
| Notebook | Ready and enabled when code execution is needed. | Configure Settings → Runtimes before requesting analysis. |
| First task | Agent response and inspectable saved output. | Inspect permissions and tool errors separately from model connection. |
Change the setup later
You don't need to rerun the wizard. Model, Agent, Runtimes, and Storage map to the same choices. If the data root is damaged or the application configuration directory isn't writable, Settings → Storage displays repair actions.
Source reference
OnboardingWizard.tsx, EnvironmentStep.tsx, LocationStep.tsx.